Hash
觉得什么笔记软件都不好用,恰好疲于选择博客主题,因此使用 mdBook 记下一点东西。
才疏学浅,应该有很多不对的地方,欢迎和我一起讨论 ^^
关于我
网名“一粒”、常用提交 ID qaqland,是 Alpine Linux && deepin Linux 桌面用户。
我的计算机知识和代码水平比较肤浅:
- 会一点 C 但是既没编译过内核也没搞过驱动
- 会一点 Rust 不过日常看不懂生命周期
- 会一点 Linux 但总是听不懂群友在讨论什么
说要做很多项目,但是至今 3000 行以上的没写出来几个。目前还在关注的有:
- Wless:定位上高于 cage 约等于 dwl 的窗管,基于 wlroots
- BuShi:目标是取代 cgit 成为 gitweb 的首选,基于 Rust 和 SQLite
以上两个项目进行了初步尝试,位于 30% 阶段。
Alpine Linux 软件打包
2024 年 1 月 14 日
软件仓库的总部叫 aports,目前是官方 GitLab 实例上的一个超大 repository,
所有与官方有关的软件包提交修改都基于仓库的流水线,有什么问题可以查阅 Wiki,
也可以前往 oftc.net 上的 #alpine-devel 频道(IRC)寻求帮助。
$ git clone --depth=1 ...
据观察基于邮箱的协作好像不太能用,只能注册 GitLab 使用。 找到官方的仓库 fork 到自己名下(就像 GitHub 那样),接下来的大致流程:
- 绑定密钥、设置用户名与用户邮箱
- 克隆自己的 fork 到本地,耐心等待
- 为自己需要修改的地方创建分支
- 修改(测试)并提交,推送新分支到仓库
- 在网页里自己的仓库页面提交合并请求
Alpine Linux 软件包的配置文件 APKBUILD 与 Arch Linux 的 PKGBUILD 非常相似, 可以偷偷去他们的网站学习打包经验, 但是不要抄袭——发行版不同、工具链不通用、分包策略也不同。 同时也非常推荐 Fedora 家的包,他们相比 Arch 更加严格规范,易于参考。
网址
- 包管理器使用 https://wiki.alpinelinux.org/wiki/Alpine_Package_Keeper
- 新建软件包 https://wiki.alpinelinux.org/wiki/Creating_an_Alpine_package
- 配置文件说明 https://wiki.alpinelinux.org/wiki/APKBUILD_Reference
- 打包相关工具 https://wiki.alpinelinux.org/wiki/Abuild_and_Helpers
- 与 aports 仓库相关的 aports/README.md
- 代码与提交格式要求 CODINGSTYLE.md COMMITSTYLE.md
- Arch Linux 的包 https://archlinux.org/packages/
- Fedora 的包 http://src.fedoraproject.org/
FAQ
由于 musl 引起的编译错误如何解决?
应该都有人遇到过,aports 搜一搜自己也做个补丁
如何知道软件需要的依赖?
- 构建依赖:
abuild rootbld一个一个添加 dev 包测试 - 运行依赖:打包时会自动识别大部分动态库,手动加上额外的运行时依赖
编译需要的 gcc 是依赖吗?
build-base 已有,不需要写,apk info -r build-base 查看类似基础组件
网络问题拉不下来构建需要的源码
使用 http 代理,例如:https_proxy=http://localhost:7890/ abuild checksum
软件包依赖另外一个自己打的本地包
abuild rootbld 时添加 ~/packages/testing/ 到 ~/aports/testing/.rootbld-repositories
怎么知道安装包里包含什么文件
新版 tar 会自动识别压缩格式,执行tar -vtf file.apk获得文件列表
每次下载软件包耗时很久
- 开启
setup-apkcache $ mirror=http://mirrors.tuna.tsinghua.edu.cn/alpine abuild rootbld
最后如果有其他问题可以联系我
C 跨行字符串
2025-12-13
实用小技巧之跨行字符串(字面量)
#define SQL(...) #__VA_ARGS__

const char *foo = SQL(
    HELLO WORLD
    \n // 111
    /* 222 */
    next  line     111?
    ""
);

// equal

const char *foo = "HELLO WORLD \n next line 111? \"\"";
细节拆解:
- Stringizing in C involves more than putting double-quote characters around the fragment. 不仅仅会在字符串两端加上双引号
- The preprocessor backslash-escapes the quotes surrounding embedded string constants, and all backslashes within string and character constants. 而且会转义字符串中适当位置的双引号
- Any sequence of whitespace in the middle of the text is converted to a single space in the stringized result. 像 Markdown 一样压缩所有的空白字符到一个空格
- Comments are replaced by whitespace 忽略注释(因为注释会在预处理器之前被处理)
上下文
为了给 bushi-index 找可以学习的素材,在 GitHub 搜索 SQLite3 项目找到了这里。 对 SQL 来说(吃掉换行符)转为一行的行为,比转成多行然后前面带缩进好。不错!
参考链接
- https://github.com/yonasBSD/litterbox/blob/1.9/database.h#L41
- https://github.com/yonasBSD/litterbox/blob/1.9/database.h#L325
- https://gcc.gnu.org/onlinedocs/cpp/Stringizing.html
CUnit Cheet Sheet
用 C 写代码是一件简单又困难的事,尤其是从 0 开始搓,补测试可以减少心理上的恐惧。
框架选择
C 语言生态很权威,只需要去 Linux 发行版的源中找到一个能顺利安装的库就行。 本文随机选到了 CUnit,需要注意两点:
- GPL-2.0-or-later 协议
- 10 年未更新了
添加依赖
如果是 Alpine Linux,可以看到系统包管理安装后已经有了 .pc 文件
$ pkgconf --cflags --libs cunit
 -lcunit
此时只需要在 meson.build 中增加一行即可
--- a/meson.build
+++ b/meson.build
@@ -12,4 +12,5 @@ project(
 dependencies = [
   dependency('sqlite3'),
   dependency('libgit2'),
+  dependency('cunit'),
 ]
然后新开一个 target 补上一条 test(target)。
测试层级
与一般的测试框架一样,具有层级结构
Test Registry
├── Suite '1'
│   ├── Test '1-1'
│   ├── ...
│   └── Test '1-M'
├── ...
└── Suite 'N'
    ├── Test 'N-1'
    ├── ...
    └── Test 'N-M'
因此最基础的测试可以这样写:
- 初始化测试表
CU_initialize_registry(void) - 新建测试套件
CU_add_suite() - 添加测试用例
CU_add_test() - 终端运行测试
CU_console_run_tests(void) - 清理测试表等
CU_cleanup_registry(void)
以上所有内容发生在一个单文件内,多文件部分暂无测试,等待后续补充。
生命周期
对于测试表,需要在一开始初始化并在最后清理(见上),这是全局作用域范围。
对于测试套件,可以在新建时传入 NULL 或两个函数指针管理生命周期, 分别在测试套件运行的前后各调用一次。
CU_pSuite CU_add_suite(const char* strName,     // UNIQUE
                       CU_InitializeFunc pInit, // int (*)(void *)
                       CU_CleanupFunc pClean);  // int (*)(void *)
错误处理
CUnit 的函数基本不需要错误处理,内存不足几乎不可能(只在测试框架中)发生。
内存不足返回的 NULL 触发 SIGSEV 是有预期而且可以接受的,程序应当崩溃。 例如 GLib 有说:
unless otherwise specified, any allocation failure will result in the application being terminated.
辅助函数
自己写的测试用例需要使用库提供的辅助函数,然后添加到测试套件。
#define CU_ADD_TEST(suite, test) (CU_add_test(suite, #test, (CU_TestFunc)test))

CU_pTest CU_add_test(CU_pSuite pSuite,
                     const char* strName,       // UNIQUE
                     CU_TestFunc pTestFunc);    // void (*)(void)
辅助函数以 CU_ 为前缀,和常见的 assert.h 差不多,只不过更丰富一点
CU_{ASSERT,TEST}
CU_ASSERT_{TRUE,FALSE}
CU_ASSERT_{,NOT_}EQUAL
CU_ASSERT_PTR_{,NOT_}EQUAL
CU_ASSERT_PTR_{,NOT_}NULL
CU_ASSERT_STRING_{,NOT_}EQUAL
CU_ASSERT_NSTRING_{,NOT_}EQUAL
CU_ASSERT_DOUBLE_{,NOT_}EQUAL
CU_{PASS,FAIL}
最后一行的 PASS 和 FAIL 小 helper 不做实际判断,仅输出 message 供用户观察。
大部分辅助函数还有带 _FATAL 后缀的版本,失败会立即崩溃退出,不推荐使用,
猜测可以用来刻意 coredump 然后 GDB 介入。
测单文件
写 C 怎么可能不写宏呢?为了避免拆多文件,把原本的 main 入口修饰一下:
#ifdef RUN_TEST
#define test_main main
#else
#define true_main main
#endif
参考阅读
- https://cunit.sourceforge.net/
- https://cunit.sourceforge.net/doc/index.html
- https://stackoverflow.com/questions/7940279/should-we-check-if-memory-allocations-fail
JuDou 句读
2025 年 5 月 14 日 记录一下项目想法
概述
JuDou 是一个基于 LSP 的代码审阅辅助工具,通过在本地建立预缓存,实现在网页端的语义高亮和引用跳转。
- 服务端:资源消耗极低
- 客户端:无需环境配置
- 流水线:自动集成构建
名称
“常买旧书的人,有时会遇到一部书,开首加过句读,夹些破句,中途却停了笔:他点不下去了。”
技术栈
- Golang
- Vue
- Json-RPC 2.0
- Json
盈利
前期贴皮广告,中期 SAAS,后期私有化部署。
直接竞争对手为 GitHub 和 Sourcegraph,潜在包括各类 LLM 分析工具。
参考
- https://github.com/netmute/ctags-lsp
- https://github.com/sourcegraph/jsonrpc2
- https://microsoft.github.io/language-server-protocol/
TinyWL’s Frame
一直想学习 wlroots 项目中的 scene 抽象,于是先从 output 的 frame 回调开始。 内容基于 0.19.0 版本的 wlroots 源码。
Request a notification when it is a good time to start drawing a new frame, by creating a frame callback…
协议 wl_surface:request:frame 确保客户端绘制与显示器同步。
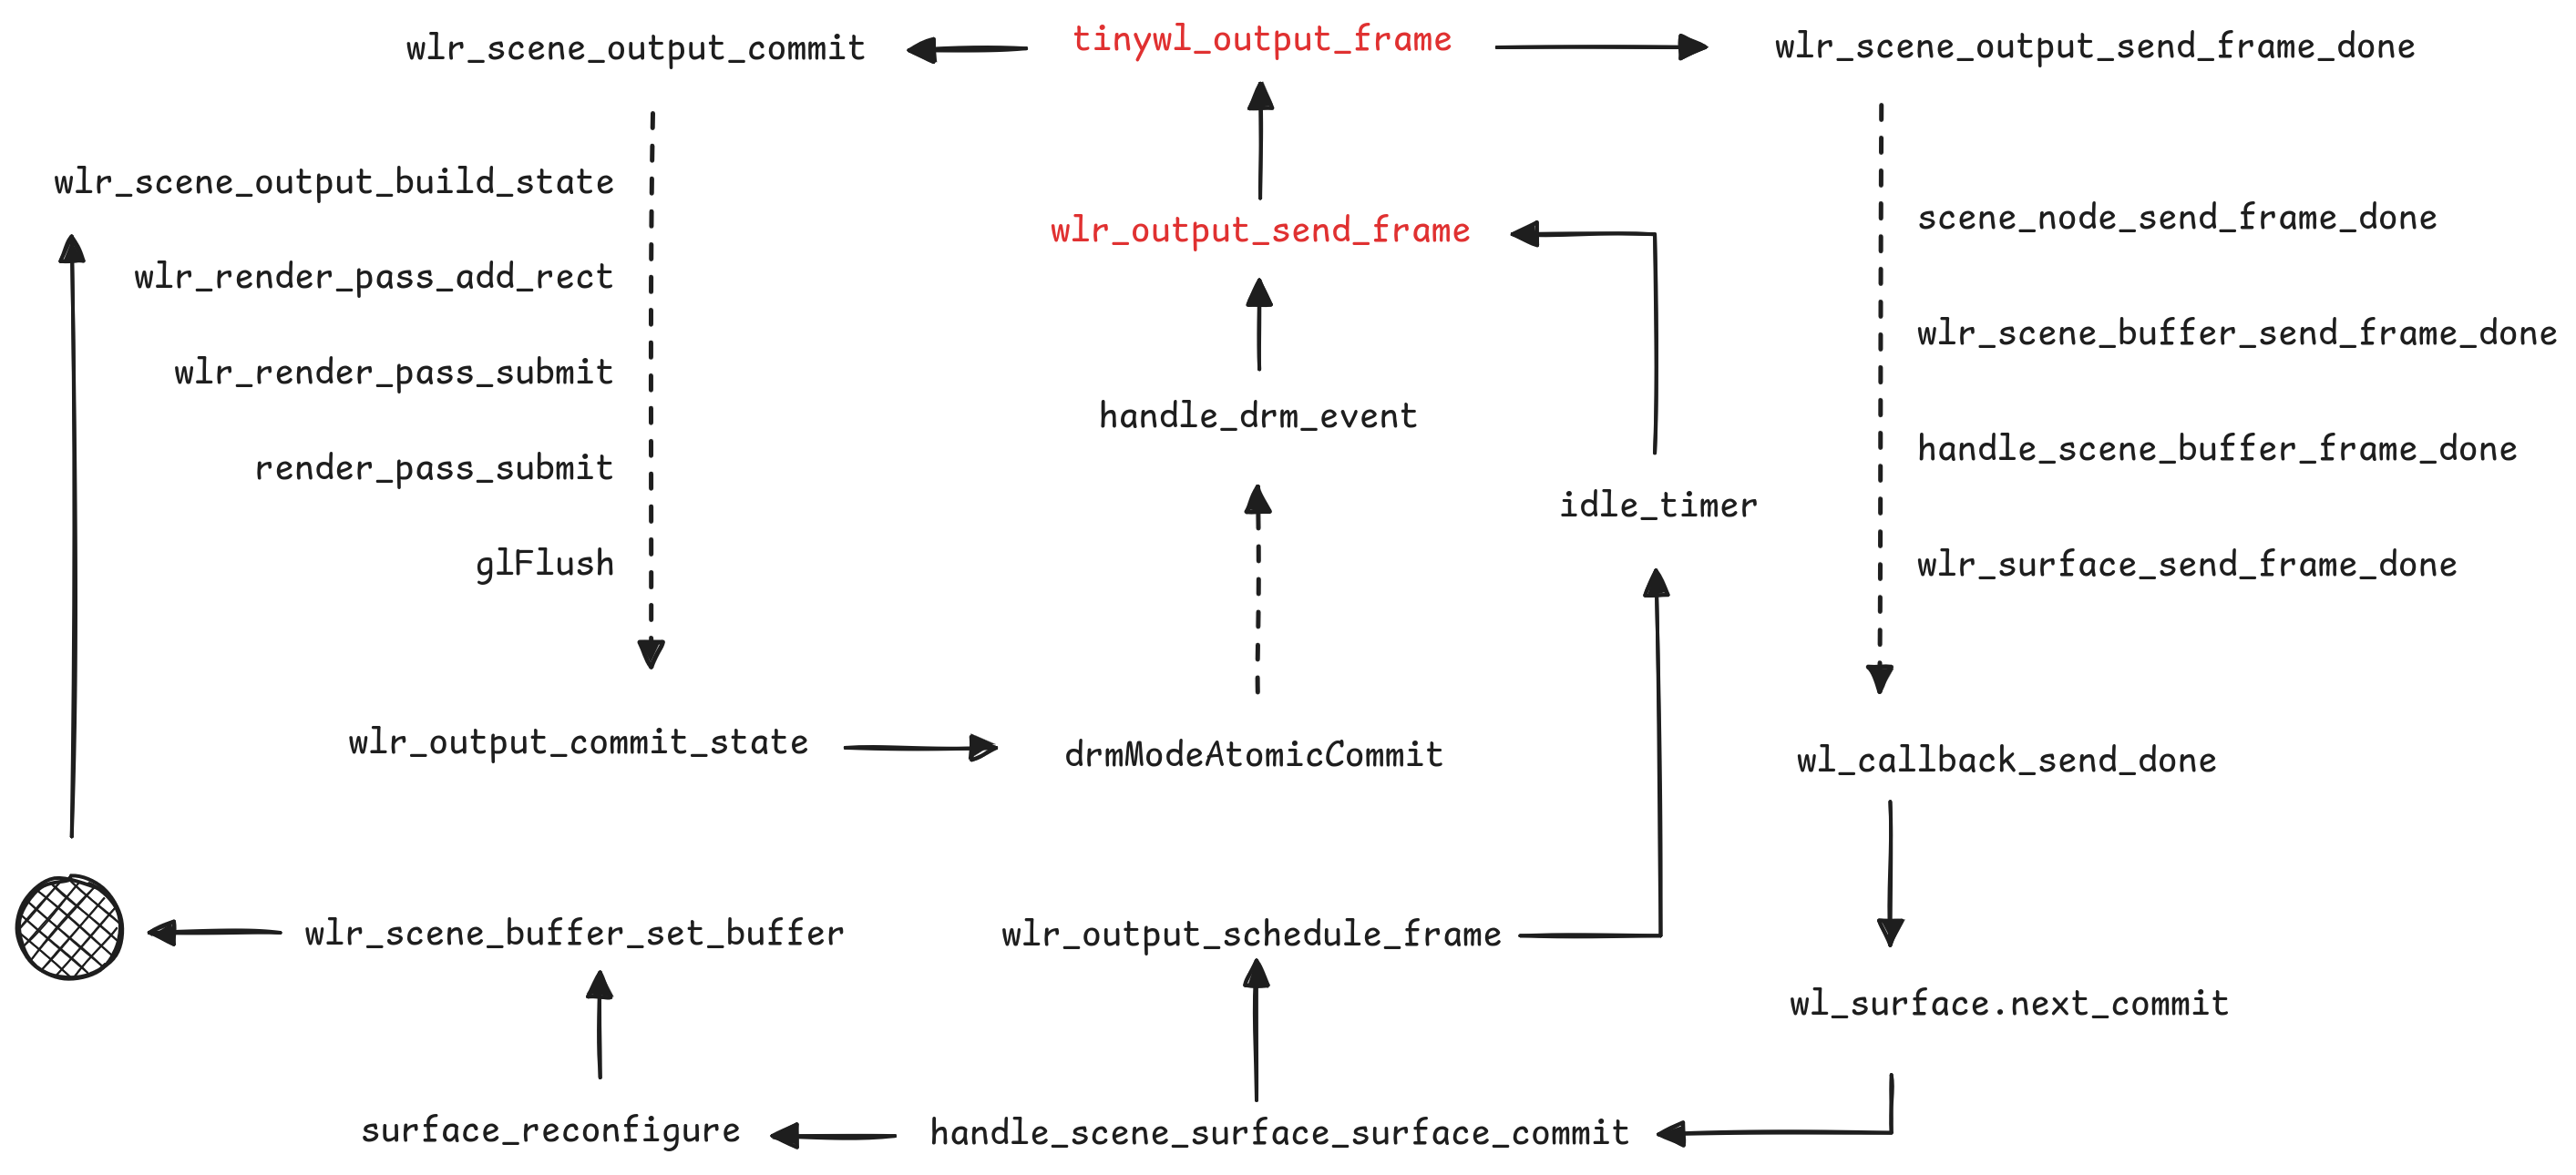
Tinywl 中 output_frame 函数绑定在 wlr_output 的 frame 信号上,
触发主要与后端有关,受到显示器的 page-flip 等帧率限制。
在合适的时间,合成器主动触发请求 frame 中的 wl_callback 回调 done,
提醒客户端可以准备下一帧。
The frame request will take effect on the next
wl_surface.commit.The
callback_datapassed in the callback is the current time…
发送一个不知何时开始的毫秒时间给客户端,想不出来除了时间还有什么其他影响。
在函数回复 done 之前的 wlr_scene_output_commit 在处理当前帧的数据状态,
wlr_output_commit_state 函数是我们在初始化 wlr_output 的 mode 时见过的老朋友。
经过接口 wlr_output_impl 和 wlr_drm_interface 的分发,
现代硬件很有可能走到了 drmModeAtomicCommit 的底层调用,
这个函数从内核绕了一圈,又会触发后端的 drm_event 产生一次 frame 事件。
TinyWL 对 wl_surface:request:commit 的监听约等于空,
可以认为是 scene 也监听了这个信号并在背后自动完成相关工作,
如函数 handle_scene_surface_surface_commit。
wlr_output_schedule_frame 和 wlr_output_send_frame 关系紧密,
一个偏业务另一个偏资源。大部分情况下应用窗口随显示器刷新不断收发:
- surface.commit
- request frame
- waiting about 1/60s
- callback.done
- surface.commit
但是应用窗口的 commit 可能不会触发 backend 的实际 commit 造成没有 frame 回调, 因此加入 schedule 以期在闲置时为应用程序有序刷新出 done。
对于 Scene 场景累积状态,以 wlr_scene_node_set_position 函数为例流程如下,
核心逻辑包含在 scene_node_bounds 和 scene_update_region 中:
步骤 1: 更新节点位置 wlr_scene_node_set_position
  node->x = 100
  node->y = 200
  ↓
步骤 2: 调用 scene_node_update
  ↓
步骤 3: 计算全局坐标 wlr_scene_node_coords
  x = 100, y = 200 (假设无父节点)
  ↓
步骤 4: 调用 scene_node_bounds(node, 100, 200, &update_region)
  update_region = rect(100, 200, width, height)
  ↓
步骤 5: 调用 scene_update_region(scene, &update_region)
  → 遍历 rect(100, 200, width, height) 内的所有节点
  → 更新每个节点的 node->visible 可见性
  → 触发 enter/leave 事件 update_node_update_outputs
  ↓
步骤 6: 完成更新,等待 wlr_scene_output_build_state
后续:发现 LLM 很好用,只要问题明确有 80% 的正确率,我要当投降派了。
Ref
- https://gitlab.freedesktop.org/wlroots/wlroots/-/blob/0.19.0/tinywl/tinywl.c
- https://wayland.app/protocols/wayland#wl_surface:request:frame
- https://wayland.app/protocols/wayland#wl_surface:request:commit
进程与环境变量
2025 年 5 月 18 日 在想办法用环境变量做程序的配置系统
数据结构
理论上讲应该采用 HashMap 的数据格式保存,以实现 O(1) 的访问速度。
#include <unistd.h>

char **__environ = 0;
weak_alias(__environ, ___environ);
weak_alias(__environ, _environ);
weak_alias(__environ, environ);

// https://git.musl-libc.org/cgit/musl/tree/src/env/__environ.c
但实际使用形如 KEY=VALUE 的字符串数组。
系统调用
对环境变量的读和写均发生在用户态:
#include <stdlib.h>
#include <string.h>
#include <unistd.h>

char *getenv(const char *name)
{
    size_t l = __strchrnul(name, '=') - name;
    if (l && !name[l] && __environ)
        for (char **e = __environ; *e; e++)
            if (!strncmp(name, *e, l) && l[*e] == '=')
                return *e + l+1;
    return 0;
}

// https://git.musl-libc.org/cgit/musl/tree/src/env/getenv.c
仅初始化与系统调用有关:
#include <unistd.h>
#include "syscall.h"

int execve(const char *path, char *const argv[], char *const envp[])
{
    /* do we need to use environ if envp is null? */
    return syscall(SYS_execve, path, argv, envp);
}

// https://git.musl-libc.org/cgit/musl/tree/src/process/execve.c
Bash
在 Bash 中很坏,“环境变量”只是普通变量的一个属性,一般用 export 关键字标识
#define att_exported    0x0000001   /* export to environment */
...
#define att_local       0x0000020   /* variable is local to a function */

// bash/variables.h

/* An array which is passed to commands as their environment.  It is
   manufactured from the union of the initial environment and the
   shell variables that are marked for export. */
char **export_env = (char **)NULL;

// bash/variables.c
所以会出现以下情况,环境变量随变量修改而改变:
export foo=bar
foo=barbar

sh -c 'echo $foo'
# output: barbar
其它对环境变量的构建和修改与普通函数无异
static inline char *
mk_env_string (name, value, attributes)
     const char *name, *value;
     int attributes;
{
    ...
    {
      p = (char *)xmalloc (2 + name_len + value_len);
      memcpy (p, name, name_len);
      q = p + name_len;
    }
    q[0] = '=';

	memcpy (q + 1, value, value_len + 1);
}

// bash/variables.c


int
shell_execve (command, args, env)
     char *command;
     char **args, **env;
{
    ...
    execve (command, args, env);
}

// bash/execute_cmd.c
Git Summary
2025-11-12
Git介绍及初始化
- https://git-scm.com/
- https://git-scm.com/book/zh/v2
- https://git-scm.com/docs
- https://github.com/git-guides
- https://lore.kernel.org/git/
- https://training.github.com/downloads/zh_CN/github-git-cheat-sheet/
- https://planet.deepin.org/deepin-2022-01-21-git-from-the-bottom-up-git/
Git是一个分布式(Version Control Software,CVS)版本控制工具,事实上的业界标准。
重要提示:Git一定要和SSH搭配用!
生成SSH密钥
# 进入用户的 ssh 目录
$ cd .ssh/

# 本地创建密钥对
$ ssh-keygen
Generating public/private ed25519 key pair.
Enter file in which to save the key (~/.ssh/id_ed25519): key-name   # 输入名字
Enter passphrase for "key-name" (empty for no passphrase):          # 留空
Enter same passphrase again:                                        # 留空
Your identification has been saved in key-name
Your public key has been saved in key-name.pub
The key fingerprint is:
SHA256:cUcRFTTxmKf1hXklQBBrfE8Muk8+AdwSwi9sM7Gc4KA anguoli@anguoli-PC
The key's randomart image is:
+--[ED25519 256]--+
|       .. ++B*Bo.|
|    . . o+ * o O.|
|   . o +.=X + B *|
|  E   . X+.* o =o|
|       .S+. o o .|
|           + .   |
|            +    |
|             .   |
|                 |
+----[SHA256]-----+

# 生成了两个文件
$ ls -l key-*
-r-------- 1 anguoli anguoli 411 11月10日 14:06 key-name
-rw-r--r-- 1 anguoli anguoli 100 11月10日 14:06 key-name.pub

# 公钥可以随意上传、分发
$ cat key-name.pub
ssh-ed25519 AAAAC3NzaC1lZDI1NTE5AAAAIGKl7MdmTVHQPbjJ2jKDzcMlLZre/eaEgUZaC9HcODR1 anguoli@anguoli-PC

# 私钥保存在本地,注意0400权限
$ cat key-name
-----BEGIN OPENSSH PRIVATE KEY-----
XXXXXXXXXXXXXXXXXXXXXXXXXXXXXXXXXXXXXXXXXXXXXXXXXXXXXXXXXXXXXXXXXXXXXX
XXXXXXXXXXXXXXXXXXXXXXXXXXXXXXXXXXXXXXXXXXXXXXXXXXXXXXXXXXXXXXXXXXXXXX
XXXXXXXXXXXXXXXXXXXXXXXXXXXXXXXXXXXXXXXXXXXXXXXXXXXXXXXXXXXXXXXXXXXXXX
XXXXXXXXXXXXXXXXXXXXXXXXXXXXXXXXXXXXXXXXXXXXXXXXXXXXXXXXXXXXXXXXXXXXXX
LZre/eaEgUZaC9HcODR1AAAAEmFuZ3VvbGlAYW5ndW9saS1QQwECAw==
-----END OPENSSH PRIVATE KEY-----
创建SSH配置
# ~/.ssh/config
Host gitlabwh.uniontech.com
    Hostname gitlabwh.uniontech.com
    User git
    IdentityFile ~/.ssh/gerrit

Host gerrit.uniontech.com
    Hostname gerrit.uniontech.com
    Port 29418
    User git
    IdentityFile ~/.ssh/gerrit

Host github.com
    Hostname ssh.github.com
    User git
    Port 443
    ProxyCommand nc -v -x 127.0.0.1:7897 %h %p
    IdentityFile ~/.ssh/github
Git使用到的SSH与普通用户字段基本相同
- Host 别名/配置名,对SSH有用
- Hostname 真实主机地址,IP或者域名
- IdentityFile 私钥绝对路径
配置代理推荐使用netcat-openbsd包提供的nc命令,可以加速走SSH的全部Git操作
- ProxyCommand 代理
-4/-6指定仅IPv4或IPv6-X [4|5|connect]SOCKS v.4, SOCKS v.5 and HTTPS proxy,默认5-x address:port%hHostname,%pPort
测试Git&SSH
ssh -T git@Host
Disable pseudo-terminal allocation. 禁用伪终端分配,不会交互式Shell会话
$ ssh -T [email protected]
Connection to ssh.github.com 443 port [tcp/https] succeeded!
Hi qaqland! You've successfully authenticated, but GitHub does not provide shell access.

$ ssh -T gitlabwh.uniontech.com
Welcome to GitLab, @ut006245!

$ ssh -T gerrit.uniontech.com
[email protected]: Permission denied (publickey).
Git配置
# 默认分支
git config --global init.defaultBranch main

# 用户和邮箱
git config --global user.name "qaqland"
git config --global user.email "[email protected]"

# 编辑器
git config --global core.editor "vim"

# 快捷别名
git config --global alias.ss status
git config --global alias.can "commit --amend --no-edit --date=now"
这些配置都会写入文件~/.gitconfig
[user]
    name = qaqland
    email = [email protected]
[init]
    defaultBranch = main

# 配置http/https需要的代理
[http "https://github.com/"]
    proxy = socks5h://127.0.0.1:7897

[alias]
    can = commit --amend --no-edit --date=now
    ss = status
[core]
    editor = vim
Git的基本数据结构
- 标准Git仓库的版本数据保存在仓库的
.git路径中 - Git命令支持的环境变量
GIT_DIR应当指向仓库的.git路径 - 裸仓库(常见于服务端)只有
.git路径和内容
Objects
Git的大部分数据都以Object的形式保存在.git/objects路径下,
每个Object都有自己的UUID也叫做Oid,以SHA1或SHA256格式存在,同一仓库不能混合使用,
大部分操作都可以尝试Oid的前缀缩写。
可以通过命令git cat-file -t OID检查类型,常见Object种类有:
- CommitObject 提交
- TreeObject 目录
- BlobObject 内容
$ git init test-backend
已初始化空的 Git 仓库于 /tmp/test-backend/.git/

$ cd test-backend/

$ echo 1 > 1
$ echo 2 > 2

$ git add .

$ git commit -m test
[main(根提交) 084ca84] test
 2 files changed, 2 insertions(+)
 create mode 100644 1
 create mode 100644 2

$ tree .git/objects/
.git/objects/
├── 08
│   └── 4ca8409b7102d53b1b279627cb41ccba5bac98  # commit
├── 0c
│   └── fbf08886fca9a91cb753ec8734c84fcbe52c9f  # blob
├── d0
│   └── 0491fd7e5bb6fa28c517a0bb32b8b506539d4d  # blob
├── de
│   └── 0ea882503cdd9c984c0a43238014569a123cac  # tree
├── info
└── pack

7 directories, 4 files
Loose & Packed
Git有两种Objects的保存后端,分别是Loose松散后端和Packed紧实后端。
如上文所示以Oid的前2位为前缀创建目录树的行为就是Loose松散后端。 松散后端由本地提交产生,其中对象仅以zlib算法压缩,占用空间较大,但写入速度快。
本地执行git gc会repack这些对象到紧实后端
$ git gc
枚举对象中: 4, 完成.
对象计数中: 100% (4/4), 完成.
使用 8 个线程进行压缩
压缩对象中: 100% (2/2), 完成.
写入对象中: 100% (4/4), 完成.
总共 4(差异 0),复用 0(差异 0),包复用 0(来自  0 个包)

$ tree .git/objects/
.git/objects/
├── info
│   ├── commit-graph
│   └── packs
└── pack
    ├── pack-5468214027a9484a198c7f3c5a6df15f12f48d9d.idx
    ├── pack-5468214027a9484a198c7f3c5a6df15f12f48d9d.pack
    └── pack-5468214027a9484a198c7f3c5a6df15f12f48d9d.rev

3 directories, 5 files
为了节省带宽、减小请求,通常在网络交互时也会repack(传输的部分)
# 文件协议,也算传输,有repack
git clone file:///tmp/test-backend/ test-clone-file

# 路径克隆,直接复制,没有repack
git clone /tmp/test-backend/ test-clone-path
先看Loose,我们写个小脚本查看实际保存的Object
#!/usr/bin/env python3

import zlib, sys

data = open(sys.argv[1], "rb").read() if len(sys.argv) > 1 else sys.stdin.buffer.read()
result = zlib.decompress(data)
sys.stdout.buffer.write(result)
CommitObject
提交Commit指向自己的历史来源,有0个、1个、2个或者更多个Parent Commit。 不同的数量表示了这次提交的不同种类,是root节点还是fast-forward这种单线链表, 或者是合并分支的Merge节点。超过2的情况不多见,是特殊的合并节点,比如内核里有:
Merge branches ‘arch-alpha’, ‘arch-arm’, ‘arch-arm64’, ‘arch-avr32’, … · torvalds/linux@9b25d60
https://github.com/torvalds/linux/commit/9b25d604182169a08b206306b312d2df26b5f502
A commit object may have any number of parents. With exactly one parent, it is an ordinary commit. Having more than one parent makes the commit a merge between several lines of history. Initial (root) commits have no parents.
当然像提交信息、提交人、提交时间、以及Committer与Author之间的区别这里不再赘述。 Commit还保存了提交时的文件(树)快照,指向当前Commit相随的Tree。
- TreeOid
- Parents’ CommitOid
- Author
- Committer
- Commit Message
这就是一个Commit对象包含的全部,当一个普通线性提交发生时, Git会扫描当前WorkTree生成TreeOid,底层保存的数据中并不关心此次提交的修改。
$ git cat-file -p 91520a2890c9cd9e99bf6cf0148811c33ffe5a3b
tree f93e3a1a1525fb5b91020da86e44810c87a2d7bc
author qaqland <[email protected]> 1762827659 +0800
committer qaqland <[email protected]> 1762827659 +0800

add readme

$ git cat-file -t 91520a2890c9cd9e99bf6cf0148811c33ffe5a3b
commit

$ git cat-file -s 91520a2890c9cd9e99bf6cf0148811c33ffe5a3b
155

$ git cat-file commit 91520a2890c9cd9e99bf6cf0148811c33ffe5a3b | wc -c
155
以这次提交为例,把原始文件zlib解压后16进制打印输出如下
$ ./zlib-cat.py .git/objects/91/520a2890c9cd9e99bf6cf0148811c33ffe5a3b | xxd
00000000: 636f 6d6d 6974 2031 3535 0074 7265 6520  commit 155.tree
00000010: 6639 3365 3361 3161 3135 3235 6662 3562  f93e3a1a1525fb5b
00000020: 3931 3032 3064 6138 3665 3434 3831 3063  91020da86e44810c
00000030: 3837 6132 6437 6263 0a61 7574 686f 7220  87a2d7bc.author
00000040: 7161 716c 616e 6420 3c71 6171 4071 6171  qaqland <qaq@qaq
00000050: 2e6c 616e 643e 2031 3736 3238 3237 3635  .land> 176282765
00000060: 3920 2b30 3830 300a 636f 6d6d 6974 7465  9 +0800.committe
00000070: 7220 7161 716c 616e 6420 3c71 6171 4071  r qaqland <qaq@q
00000080: 6171 2e6c 616e 643e 2031 3736 3238 3237  aq.land> 1762827
00000090: 3635 3920 2b30 3830 300a 0a61 6464 2072  659 +0800..add r
000000a0: 6561 646d 650a                           eadme.
起始commit和155表示类型和大小(不包括头部),和前文的cat-file -t|-s对应
| HEX | Description |
|---|---|
00 | Null character |
20 | Space |
0a | Line Feed |
30 | Zero |
TreeObject
$ git cat-file -p f93e3a1a1525fb5b91020da86e44810c87a2d7bc
100644 blob e69de29bb2d1d6434b8b29ae775ad8c2e48c5391    README.md

$ git cat-file -t f93e3a1a1525fb5b91020da86e44810c87a2d7bc
tree

$ git cat-file -s f93e3a1a1525fb5b91020da86e44810c87a2d7bc
37

$ git cat-file tree f93e3a1a1525fb5b91020da86e44810c87a2d7bc | wc -c
37

$ git cat-file tree f93e3a1a1525fb5b91020da86e44810c87a2d7bc | xxd
00000000: 3130 3036 3434 2052 4541 444d 452e 6d64  100644 README.md
00000010: 00e6 9de2 9bb2 d1d6 434b 8b29 ae77 5ad8  ........CK.).wZ.
00000020: c2e4 8c53 91
一个TreeObject保存任意数量的TreeObject和BlobObject,保存信息有子目录或文件的 权限(条目类型)、条目名称、条目Oid。
$ ./zlib-cat.py .git/objects/f9/3e3a1a1525fb5b91020da86e44810c87a2d7bc | xxd
00000000: 7472 6565 2033 3700 3130 3036 3434 2052  tree 37.100644 R
00000010: 4541 444d 452e 6d64 00e6 9de2 9bb2 d1d6  EADME.md........
00000020: 434b 8b29 ae77 5ad8 c2e4 8c53 91         CK.).wZ....S.
仓库的Oid长度是统一且固定的,如果采用SHA1就是40个十六进制字符,SHA256拓展到64个。
在TreeObject对象中,条目是按照路径排序的,TreeObject条目会在排序时默认带上尾随斜杠
The entries in a tree are ordered in the path order, which means that a directory entry is ordered by adding a slash to the end of it.
So a directory called “a” is ordered after a file called “a.c”, because “a/” sorts after “a.c”.
git/fsck.c at 6074a7d4ae6b658c18465f10bbbf144882d2d4b0 · git/git
$ git ls-tree 00a741484baadea211c493ebbf5fb00208f86493
100644 blob 85d4df20ce3cce7d9bf31f98ee2239683fdc776e	.editorconfig
100644 blob 0493cf8daa1629bdba77e9bdde6106ff9783fc50	.gitattributes
040000 tree 1297f3467c63c4ff48a98fd2a24d747c68aa3f80	.githooks
040000 tree b79b5cc40348d01f293bd9cbf8483cc077459c38	.github
100644 blob 43fb11d16d0008c3314eeab288f49b6189d680dd	.gitignore
100644 blob 70d4ae27a4b250d03eaded0509f86347e6192c42	.gitlab-ci.yml
040000 tree aefeddacabdf8150f47faf3aabd098c5c7c32440	.gitlab
100644 blob b7bf3d42eb30206489f669629bd95c8fcb2d2ee6	.mailmap
100644 blob 8d11373a95ba9d87c8a51193c37d5aa02e2dd301	CODINGSTYLE.md
100644 blob ab8c36d86bcf6eaaff348f1c24bf6594bdcabdfb	COMMITSTYLE.md
100644 blob 27d11c0186c4e846c5d5f64af7121cadbb8d785f	README.md
040000 tree 42aae92dacdae1a5d53531d23ddbac8aeabd13e8	community
040000 tree 0cc9f0ba0475a8302206e431ca51319ce21d6b54	main
040000 tree dcaedd687a45f21b59296a063787a5ee15385716	scripts
040000 tree 8f5eebf9181a091b171b123f6377108560f5ecdf	testing
BlobObject
没有任何技巧和优化的:类型、大小、内容,不保存自己的名称
假如文件内容为Hello World\n:
# 文件末尾有换行
$ hexdump -C hello
00000000  48 65 6c 6c 6f 20 57 6f  72 6c 64 0a              |Hello World.|
0000000c

# 文件长度为12
$ wc -c hello
12 hello
可以计算得到此时的sha1sum
# 类型 + 空格 + 长度 + NUL + 内容
$ printf "blob 12\0Hello World\n" | sha1sum
557db03de997c86a4a028e1ebd3a1ceb225be238  -
添加文件并提交后可以看到git给出的BlobOid与我们手动计算的相同
$ tree .git/objects/
.git/objects/
├── 11
│   └── 7c62a8c5e01758bd284126a6af69deab9dbbe2
├── 55
│   └── 7db03de997c86a4a028e1ebd3a1ceb225be238  <<< 这里
├── f7
│   └── a2bdf7b9df15cdbc88907855a2f55170839af8
├── info
└── pack

6 directories, 3 files
Reference
引用(Reference)类似C语言的指针,
分为直接引用(指向具体的Oid)和符号引用(指向其他引用)两种,
保存在.git/*HEAD、.git/packed-refs和.git/refs/路径下。
直接引用(Direct Reference)存储的是完整的Oid, 如果指向的提交被删除或修改,直接引用可能失效(成为悬空引用), 如果直接引用被删除,可能导致指向的一系列对象变为垃圾对象(分离状态)。 常见的直接引用有:
refs/heads/main分支refs/tags/v1.0标签refs/remotes/origin/main远程分支
符号引用(Symbolic Reference)本身不指向具体对象,而是指向另一个引用,相当于间接指针。
最常见的HEAD就是符号引用,指向当前分支(如refs/heads/main)
$ cat .git/HEAD
ref: refs/heads/main

$ cat .git/refs/heads/main
f7a2bdf7b9df15cdbc88907855a2f55170839af8

$ git log -1
commit f7a2bdf7b9df15cdbc88907855a2f55170839af8 (HEAD -> main)
Author: qaqland <[email protected]>
Date:   Tue Nov 11 13:55:14 2025 +0800

    hello
// HEAD @ ~ ^
Git的日常使用方法
老生常谈的“工作区”、“暂存区”、“版本库”三个概念,他们是为了确保提交的原子性(完整性)。 类比到Wayland:
- Git:
git commit操作是原子性的。 要么整个暂存区的内容全部成功提交,创建一个新的版本记录;要么失败,版本库保持原样。 永远不会看到一个“只提交了一半文件”的版本库状态。 - Wayland:缓冲区交换操作也是原子性的。 在垂直同步信号到来时,系统会瞬间将指向屏幕的指针从“前缓冲区”切换到“完成后缓冲区”。 用户永远不会看到一帧“画了一半”的图像。
这个“原子性”确保了从一个状态(上次提交的版本/上一帧画面)平滑过渡到下一个状态(新的提交/新的一帧画面)。
git-log
# 显示提交图
$ git log --oneline --graph --all

# 显示提交代码
$ git log -p

# 添加路径筛选
$ git log -- PATH

# 限制数量
$ git log -n NUM
$ git log -5

# 指定分支/标签/提交的历史
$ git log HEAD
如果希望查看当前其他分支的最新提交
$ git branch -v
  bump-py3-pytest-asyncio-1.2.0 072086e312b community/py3-pytest-asyncio: upgrade to 1.2.0
  lazydocker                    729c43ddb8b community/lazydocker: add runtime depends ncurses
* master                        00c9c05d721 [ahead 186] main/{kea,pgpool}: rebuild against postgresql 18
  new-linyaps-box               9fc79988ded testing/linyaps-box: new aport
  new-microsocks                29e2abdbc99 testing/microsocks: new aport
git-diff
对比差异,观察修改。下面举例说明顺位规律,先创建两次提交,针对同一文件做修改:
# 反序输出,从上到下
$ git log --oneline --reverse -p
221152d 111                     <<< 第一次提交
diff --git a/hello b/hello
new file mode 100644
index 0000000..2e3e313
--- /dev/null
+++ b/hello
@@ -0,0 +1 @@
+第一次增加

c95a70b (HEAD -> main) 222      <<< 第二次提交
diff --git a/hello b/hello
index 2e3e313..6c27065 100644
--- a/hello
+++ b/hello
@@ -1 +1,2 @@
 第一次增加
+第二次增加
git diff期待两个位置参数,旧提交在前,新提交在后。
$ git diff 221152d c95a70b
diff --git a/hello b/hello
index 2e3e313..6c27065 100644
--- a/hello
+++ b/hello
@@ -1 +1,2 @@
 第一次增加
+第二次增加
接下来对文件进行修改,添加修改进暂存区,再次修改,结果如下:
$ git blame -s hello
^221152d 1) 第一次增加
c95a70bf 2) 第二次增加
00000000 3) 暂存区增加(未提交)
00000000 4) 工作区增加
工作区 vs 暂存区
$ git diff
diff --git a/hello b/hello
index e364217..9332b3e 100644
--- a/hello
+++ b/hello
@@ -1,3 +1,4 @@
 第一次增加
 第二次增加
 暂存区增加(未提交)
+工作区增加
暂存区 vs HEAD
$ git diff --staged
$ git diff --cached
diff --git a/hello b/hello
index 6c27065..e364217 100644
--- a/hello
+++ b/hello
@@ -1,2 +1,3 @@
 第一次增加
 第二次增加
+暂存区增加(未提交)
工作区 vs HEAD
$ git diff HEAD
$ git diff HEAD
diff --git a/hello b/hello
index 6c27065..9332b3e 100644
--- a/hello
+++ b/hello
@@ -1,2 +1,4 @@
 第一次增加
 第二次增加
+暂存区增加(未提交)
+工作区增加
生成补丁的格式为Unified Diff Format,一种标准化的补丁格式,被广泛用于软件开发和版本控制系统。
$ git diff
diff --git a/hello b/hello
index e364217..9332b3e 100644
--- a/hello
+++ b/hello
@@ -1,3 +1,4 @@
 第一次增加
 第二次增加
 暂存区增加(未提交)
+工作区增加
对于补丁来说,前两行算注释可以删掉,也可以手动增加一点描述信息。
重要的部分从@@行开始,这是变更块头(chunk header)描述了修改发生的上下文:
@@ -旧版本起始行,旧版本行数 +新版本起始行,新版本行数 @@
如果需要手动修改生成的补丁,注意补丁显示的代码行数要和变更块头的描述对应:
这是注释部分,可以随意写。以下两条命令生成的补丁上下文范围不同,但效果相同

$ git diff -U2                  <<< 指定上下文范围2
diff --git a/hello b/hello
index e364217..9332b3e 100644
--- a/hello
+++ b/hello
@@ -2,2 +2,3 @@                 <<<
 第二次增加
 暂存区增加(未提交)
+工作区增加

$ git diff -U3                  <<< 指定上下文范围3
diff --git a/hello b/hello
index e364217..9332b3e 100644
--- a/hello
+++ b/hello
@@ -1,3 +1,4 @@                 <<<
 第一次增加
 第二次增加
 暂存区增加(未提交)
+工作区增加
git-email
用的不多,推荐教程
Learn to use email with git!
git-reset
软重置,将之前的提交“取消“,所有修改保留在暂存区
$ git reset --soft

Before: A - B - C (HEAD)
After:  A - B (HEAD)

          C 的修改在暂存区
默认混合重置,重置暂存区,修改保留在工作区
$ git reset [--mixed]

Before: A - B - C (HEAD)
After:  A - B (HEAD)

          C 的修改在工作区(未暂存)
硬重置,丢弃所有未提交的修改,完全回退到指定提交的状态
$ git reset --hard

Before: A - B - C (HEAD) + 工作区修改
After:  A - B (HEAD)  # 完全回到B的状态,所有修改丢失
硬重置很危险,如果误删可以尝试恢复:
# 查看所有操作历史
$ git reflog

# 找到重置前的提交哈希
$ git reset --hard HEAD@{1}  # 恢复到前一个状态
恢复历史将会在git gc后清空。
git-rebase
更新当前分支到主分支最新状态
# 初始状态
A - B - C (main)
     \
      D - E (feature)

$ git checkout feature
$ git rebase main

# 变基后状态
A - B - C (main)
           \
            D' - E' (feature)
交互式操作提交
# 不包含起点
$ git rebase -i 基准OID

# 修改最后5个提交
$ git rebase -i HEAD~5

# 把其中的pick改为edit
$ git add
$ git commit --amend
$ git rebase --continue
注意rebase会修改基准提交之后所有提交的Oid
git-bundle
如何把本地的仓库备份或发送给别人
$ git clone --mirror https://github.com/alpinelinux/apk-tools.git
$ cd apk-tools
$ git bundle create apk-tools.bundle --all
生成的bundle文件就是一个完整仓库的打包,企业微信或者U盘发送后,再clone出来就行
$ du -sh apk-tools.bundle
4.1M    apk-tools.bundle
$ git clone --bare apk-tools.bundle <new directory>
如果都是自己的电脑有SSH,直接clone就行
$ git clone n5105:~/dotfiles
正克隆到 'dotfiles'...
remote: Enumerating objects: 23, done.
remote: Counting objects: 100% (23/23), done.
remote: Compressing objects: 100% (19/19), done.
remote: Total 23 (delta 4), reused 0 (delta 0), pack-reused 0 (from 0)
接收对象中: 100% (23/23), 完成.
处理 delta 中: 100% (4/4), 完成.
Git的内部优化算法
理论上讲Git中有三个大类别的对象:Commit、Tree、Blob,具体到解析时还有Commit的同类Tag及Note。
这些对象以各自Object的hash作为Oid索引,经zlib压缩后保存在.git/objects下的文件中,
纯正文件系统驱动,并在需要时被解析。
Git 的数据结构为写多读少设计,因此其他程序应避免将 Git 作为数据库使用。
CommitGraph
Git中的每次提交都会创建对应的CommitObject,但是当需要遍历仓库历史的时候, 大量读就成了一个问题。 Git并没有在Commit中描述这次提交修改了哪些文件,所以若要知晓给定文件的最后修改日期,过程较为艰难:
- 获取Commit的TreeOid与Parent Commit的TreeOid
- 在两个Tree Object中遍历,查找修改的文件
- 检查给定文件是否在本次Commit中修改
- 重复上述操作,直到两次提交的树之间存在期望差异
Git内部在第二步和第三步之间有Diff优化,仅对比给定的路径, 但整体在没有对应数据结构的情况下进行类似的结构化查询还是相当消耗性能, 面对稍微大一点的仓库,时间来到秒级:
$ /usr/bin/time git -c core.commitGraph=false log --oneline -n 10 community/xmake/
81380060446 community/xmake: upgrade to 2.9.9
7c21bea5624 */*: replace non-POSIX find -not option
a92fe0ba060 community/xmake: upgrade to 2.9.7
12374870a8f community/xmake: upgrade to 2.9.6
12c188ec967 community/xmake: upgrade to 2.9.5
0096aeef07c community/xmake: upgrade to 2.9.4
4b130eb7f5a community/xmake: upgrade to 2.9.3
d516ffbb476 community/xmake: upgrade to 2.9.2
d74b311e776 community/xmake: move from testing
real    0m 51.11s
user    0m 41.44s
sys     0m 9.56s
Git在2.18版本后引入了提交图(CommitGraph)的概念,保存提交相关的额外索引信息到
.git/objects/info/commit-graph。
针对每个对象,使用独立的布隆过滤器对提交修改做缓存,理想情况下,最快的查询条件为:
# 激进垃圾回收并repack
$ git gc --aggressive

# 创建带有路径修改信息的提交图索引
$ git commit-graph write --changed-paths
经过上述修改性能提升明显:
$ /usr/bin/time git -c core.commitGraph=true log --oneline -n 10 community/xmake/
81380060446 community/xmake: upgrade to 2.9.9
7c21bea5624 */*: replace non-POSIX find -not option
a92fe0ba060 community/xmake: upgrade to 2.9.7
12374870a8f community/xmake: upgrade to 2.9.6
12c188ec967 community/xmake: upgrade to 2.9.5
0096aeef07c community/xmake: upgrade to 2.9.4
4b130eb7f5a community/xmake: upgrade to 2.9.3
d516ffbb476 community/xmake: upgrade to 2.9.2
d74b311e776 community/xmake: move from testing
real    0m 1.99s
user    0m 1.17s
sys     0m 0.81s
扩展阅读:
- Git - git-commit-graph Documentation
- Supercharging the Git Commit Graph - Azure DevOps Blog
- Updates to the Git Commit Graph Feature - Azure DevOps Blog
Packfile
算法部分暂时略,核心思想就是差异压缩:
- 所有对象按照Oid顺序保存方便mmap与二分
- 在文件开头创建范围索引
- 对象之间按照窗口期查找“基对象”进行差异压缩
- 多个Packfile之间创建Oid索引
经过差异压缩,体积可实现有20倍的缩小。接下来进行演示
读一点随机数模拟文件内容
$ head -c 500 /dev/urandom | base64 | head -n 50 > random_output.txt
在这个文件的基础上创建文件2
$ cp random_output.txt random_output_2.txt
$ echo "add new line" >> random_output_2.txt
直接添加提交,Git不会主动repack压缩,此时是原始Loose Objects存储
$ ls -lh
总计 8.0K
-rw-rw-r-- 1 anguoli anguoli 690 11月11日 22:12 random_output_2.txt
-rw-rw-r-- 1 anguoli anguoli 677 11月11日 22:09 random_output.txt

$ tree -h .git/objects/
[ 160]  .git/objects/
├── [  60]  02
│   └── [ 556]  3dc71e0501e56c41bc7a2b6236f167c7094360  <<<
├── [  60]  06
│   └── [ 112]  ffbb31a44b95173b16baa580941ce54984cb04
├── [  60]  c3
│   └── [ 567]  c41712bdc2d4c2de08aee19d8f3e319fb82e83  <<<
├── [  60]  fd
│   └── [  89]  040d11c4b1b4af03ac409dbefbf6fb94c50b1c
├── [  40]  info
└── [  40]  pack

7 directories, 4 files

$ git cat-file -s 023dc71e
677
通过手动gc达成repack压缩
$ git gc
枚举对象中: 4, 完成.
对象计数中: 100% (4/4), 完成.
使用 8 个线程进行压缩
压缩对象中: 100% (3/3), 完成.
写入对象中: 100% (4/4), 完成.
总共 4(差异 1),复用 4(差异 1),包复用 0(来自  0 个包)

$ tree -h .git/objects/
[  80]  .git/objects/
├── [  80]  info
│   ├── [1.1K]  commit-graph
│   └── [  54]  packs
└── [ 100]  pack
    ├── [1.2K]  pack-6184e7108e795f0abc08d03baa4d2b49cd6d5d80.idx
    ├── [ 805]  pack-6184e7108e795f0abc08d03baa4d2b49cd6d5d80.pack  <<<
    └── [  68]  pack-6184e7108e795f0abc08d03baa4d2b49cd6d5d80.rev

3 directories, 5 files

$ git verify-pack -v .git/objects/pack/pack-6184e7108e795f0abc08d03baa4d2b49cd6d5d80.pack
06ffbb31a44b95173b16baa580941ce54984cb04 commit 144 107 12
023dc71e0501e56c41bc7a2b6236f167c7094360 blob   677 549 119
c3c41712bdc2d4c2de08aee19d8f3e319fb82e83 blob   21 33 668 1 023dc71e0501e56c41bc7a2b6236f167c7094360
fd040d11c4b1b4af03ac409dbefbf6fb94c50b1c tree   92 84 701
非 delta:3 个对象
链长 = 1: 1 对象
.git/objects/pack/pack-6184e7108e795f0abc08d03baa4d2b49cd6d5d80.pack: ok
最后分别显示的是
<unpack-size> <size-in-packfile> <offset-in-packfile>
Git周边生态及开发
代码托管
- https://github.com
- https://about.gitlab.com/
- https://gitee.com/ 用了很多前者的基建
- https://gogs.io/ CVE修得少,不推荐
- https://about.gitea.com/ MIT,前者的fork
- https://forgejo.org/ GPL,前者的fork
- https://sourcehut.org/ Old School
- https://git.zx2c4.com/cgit/about/ 只读网页
- https://github.com/sitaramc/gitolite 无界面
- https://www.gerritcodereview.com/ 补丁审阅
其他链接:
- https://en.wikipedia.org/wiki/Comparison_of_source-code-hosting_facilities
- https://en.wikipedia.org/wiki/Forge_(software)#Examples
- https://onedev.io/ Java,v2ex有创始人
- https://pagure.io/ Fedora家的
- https://gerrit.googlesource.com/gitiles Gerrit搭档
- https://radicle.xyz/ Web3分布式
- https://forge.lindenii.org/
- https://github.com/yuki-kimoto/gitprep
- https://github.com/gitblit-org/gitblit
- https://gitlist.org/ PHP只读
- https://github.com/PGYER/codefever 蒲公英家的
- https://github.com/oxalorg/stagit 静态页面
当从GitHub拉仓库的时候,如果选择SSH则地址如下:
>>> [email protected]:user/repo.git
约等于SSH中git用户在操作github.com这个Host的user/repo.git路径下的仓库。
对个人来说最简单的情况不需要考虑权限,就是直接用SSH地址。
鉴权 & 认证
// 服务端与本地如何交互
// SSH认证
// Hooks鉴权
ChangeId
开源项目
- https://github.com/libgit2/libgit2 Pure C
- https://github.com/go-git/go-git Pure Go
- https://github.com/GitoxideLabs/gitoxide Pure Rust
- https://github.com/FredrikNoren/ungit Pure JavaScript
- https://gitlab.com/gitlab-org/gitaly/ Git RPC
Git 提交代次
期望
为每个 Commit 保存它的 generation 信息到数据库, 代次(深度)信息是「祖先跳表」方法的基础。
做法
设置根提交的 generation 为 0,后续子代依次 +1
UPDATE
    commits
SET
    generation = parent.generation + 1
FROM
    commits AS parent
WHERE
    commits.generation IS NULL
    AND parent.generation IS NOT NULL
    AND commits.repository_id = parent.repository_id
    AND commits.parent_hash = parent.commit_hash
;

CREATE INDEX IF NOT EXISTS idx_commits_null_generation
    ON commits(repository_id, parent_hash)
    WHERE generation IS NULL;
CREATE INDEX IF NOT EXISTS idx_commits_parent_lookup
    ON commits(repository_id, commit_hash, generation)
    WHERE generation IS NOT NULL;
循环
上述 SQL 只能更新一个层面的 Commit,因此丢在 do-while 循环中反复执行
int rows_affected = 0;
sqlite3_stmt *stmt = stmts[STMT_UPDATE_GENERATION];
do {
    sqlite3_exec(connection, "BEGIN TRANSACTION;", NULL, NULL, NULL);

    sqlite3_reset(stmt);
    sqlite3_step(stmt);
    rows_affected = sqlite3_changes(connection);

    sqlite3_exec(connection, "COMMIT;", NULL, NULL, NULL);
} while (rows_affected > 0);
障碍
速度还是太慢了,即使有(缺省)索引依然需要全表扫描。
$ cat update-generation.sql | sqlite3 stage.db
QUERY PLAN
|--SCAN commits USING INDEX idx_commits_null_generation
`--SEARCH parent USING COVERING INDEX idx_commits_parent_lookup (repository_id=? AND commit_hash=? AND generation>?)
对于有 26 万个提交的 aports 测试用例来说,循环完成需要 4 个多小时。
投降
之前在检测 Commit 会修改哪些文件的时候已经投降过一次了,现在只能继续投降。
抱住 Git 二进制的大腿,尝试逆序输出解析。
$ git log --pretty=format:%n%H --name-only --first-parent --reverse
%H显示完整 CommitHash%n显示一个\nname-only输出当前提交涉及修改的文件名first-parent单线遍历reverse逆序输出
成本
投降之前评估一下成本,理论上来说逆序应该更耗时,因为正序是 FIFO,逆序需要状态。 但是实际测试区别不明显,甚至逆序耗时更短?
$ hyperfine "git log --pretty=format:%H --name-only --first-parent" \
            "git log --pretty=format:%H --name-only --first-parent --reverse"
Benchmark 1: git log --pretty=format:%H --name-only --first-parent
  Time (mean ± σ):     233.308 s ±  1.055 s    [User: 209.537 s, System: 22.922 s]
  Range (min … max):   232.254 s … 235.719 s    10 runs

Benchmark 2: git log --pretty=format:%H --name-only --first-parent --reverse
  Time (mean ± σ):     232.894 s ±  0.565 s    [User: 208.993 s, System: 23.075 s]
  Range (min … max):   232.023 s … 233.930 s    10 runs

Summary
  git log --pretty=format:%H --name-only --first-parent --reverse ran
    1.00 ± 0.01 times faster than git log --pretty=format:%H --name-only --first-parent
$ /usr/bin/time -v git log --pretty=format:%H --name-only --first-parent > /dev/null
	Command being timed: "git log --pretty=format:%H --name-only --first-parent"
	User time (seconds): 208.61
	System time (seconds): 22.89
	Percent of CPU this job got: 99%                <<< 单线程进程,CPU 满载
	Elapsed (wall clock) time (h:mm:ss or m:ss): 3m 52.31s
	Average shared text size (kbytes): 0
	Average unshared data size (kbytes): 0
	Average stack size (kbytes): 0
	Average total size (kbytes): 0
	Maximum resident set size (kbytes): 669828      <<< 最大内存占用 600M
	Average resident set size (kbytes): 0
	Major (requiring I/O) page faults: 0
	Minor (reclaiming a frame) page faults: 12839624
	Voluntary context switches: 1
	Involuntary context switches: 367               <<< 别的都看不懂
	Swaps: 0
	File system inputs: 0
	File system outputs: 0
	Socket messages sent: 0
	Socket messages received: 0
	Signals delivered: 0
	Page size (bytes): 4096
	Exit status: 0
$ /usr/bin/time -v git log --pretty=format:%H --name-only --first-parent --reverse > /dev/null
	Command being timed: "git log --pretty=format:%H --name-only --first-parent --reverse"
	User time (seconds): 210.01
	System time (seconds): 23.14
	Percent of CPU this job got: 99%
	Elapsed (wall clock) time (h:mm:ss or m:ss): 3m 53.98s
	Average shared text size (kbytes): 0
	Average unshared data size (kbytes): 0
	Average stack size (kbytes): 0
	Average total size (kbytes): 0
	Maximum resident set size (kbytes): 612564
	Average resident set size (kbytes): 0
	Major (requiring I/O) page faults: 0
	Minor (reclaiming a frame) page faults: 12762389
	Voluntary context switches: 2
	Involuntary context switches: 475
	Swaps: 0
	File system inputs: 0
	File system outputs: 0
	Socket messages sent: 0
	Socket messages received: 0
	Signals delivered: 0
	Page size (bytes): 4096
	Exit status: 0
结果
qaq^n5105 bushi/bushi-index main*
$ ./build/bushi-index -t stage.db -p ~/aports/.git > log

qaq^n5105 bushi/bushi-index main* 4m52s
不到 5 分钟!满意,收工!
链接
- https://git-scm.com/docs/git-log
- https://sqlite.org/partialindex.html
- https://github.com/sharkdp/hyperfine
Git 祖先跳表
- 2025-05-04 介绍一下 bushi 所使用的祖先跳表
- 2025-12-19 更新了表结构,刷新字符串并补充
场景
在 GitWeb 中指定 Commit 的详情页面显示在远端的存在情况
- Branches containing commit
- Tags containing commit
这种请求需要判断 Reference 对应的 Commit 是否可达指定 Commit
限制
仅考虑 Commit 的第一个 Parent Commit,否则从链表退化到树,复杂程度翻倍
Note
With the –changed-paths option, compute and write information about the paths changed between a commit and its first parent.
原版 git-commit-graph 同样设计如此
原理
如果什么都不做,判断只有两步:
- 对比 generation 是否合理
- 向上「依次」遍历到 generation 相等,检查是否相遇
对于可能超过 10 万提交的成熟项目,CTE 的耗时到秒级。 如果有 100 个分支,请求处理时间超出 1 分钟。
bushi 在表中以跳表形式额外存储了每个 Commit 的「祖先」信息,新判断为:
- 对比 generation 是否合理,计算得到差值
- 对 generation 的差值转二进制 BIN,1 跳 0 不跳,得到跳表节点
- 向上按照「跳表」遍历到 generation 相等,检查是否相遇
时间复杂度从 O(n) 降低到了 O(log n)
验证
选择 Alpine Linux 的软件包构建脚本仓库深度距离为 100K 的两个提交,对应的 Commit 如下
sqlite> SELECT * FROM commits WHERE generation in (100, 100000);
commit_id  commit_hash                               parent_hash                               generation  repository_id
---------  ----------------------------------------  ----------------------------------------  ----------  -------------
237494     3845839a16f3162c2362e9271f59fe52cef7bf83  44a369d15ac69464584099d339a0e1ec1ec7fa66  100         1
137594     73a0fc8c219239f2df973722cf1bd75ce9aa1bf7  d435959ada011bdf44a535aa1297ad86d0f0f235  100000      1
两者 generation 之差转为二进制数得到 2 的 N 次幂
>>> bin(99900)
'0b11000011000111100'
顺着 BIN 的二进制数,位数表示 exponent,1 跳 0 不跳
16  15                  10  9               5   4   3   2
1   1   0   0   0   0   1   1   0   0   0   1   1   1   1   0   0
假设有下面的 STMT 然后以绑定参数的形式执行
SELECT
    ancestors.commit_id,
    exponent,
    ancestor_id,
    generation
FROM
    ancestors
JOIN
    commits
ON
    commits.commit_id = ancestors.commit_id
WHERE
    commits.commit_id = ?1
    AND exponent = ?2;
从左跳也是一样的,但是右边开始可能有利于 SQLite 缓存命中
STMT(137594,  2) => 137598
STMT(137598,  3) => 137606
STMT(137606,  4) => 137622
STMT(137622,  5) => 137654
STMT(137654,  9) => 138166
STMT(138166, 10) => 139190
STMT(139190, 15) => 171958
STMT(171958, 16) => 237494
最终得到 commit_id 与目标相同,两者位于同一分支中。
友商
GitLab 家的 Gitaly 提供了 RPC-Git 接口 ListBranchNamesContainingCommit
ListBranchNamesContainingCommit finds all branches under
refs/heads/that contain the specified commit. The response is streamed back to the client to divide the list of branches into chunks.
不过只有对 Git 的封装
type containingRequest interface {
	GetCommitId() string
	GetLimit() uint32
}


func containingArgs(...) []string {
	args := []string{fmt.Sprintf("--contains=%s", req.GetCommitId())}
	if limit := req.GetLimit(); limit != 0 {
		args = append(args, fmt.Sprintf("--count=%d", limit))
	}
	return args
}

func listRefNames(...) error {
	flags := []gitcmd.Option{
		gitcmd.Flag{Name: "--format=%(refname)"},
	}

	for _, arg := range extraArgs {
		flags = append(flags, gitcmd.Flag{Name: arg})
	}

	cmd, err := repo.Exec(ctx, gitcmd.Command{
		Name:  "for-each-ref",
		Flags: flags,
		Args:  []string{prefix},
	}, gitcmd.WithSetupStdout())
	...
}
- https://gitlab.com/gitlab-org/gitaly/-/issues/1744
- https://gitlab.com/gitlab-org/gitaly/-/merge_requests/537
- https://gitlab.com/gitlab-org/gitaly/-/blob/v18.7.0/internal/gitaly/service/ref/refnames_containing.go
再去看 Gitea 家,也是 Git 命令的封装
func (repo *Repository) ListOccurrences(ctx context.Context, refType, commitSHA string) ([]string, error) {
	cmd := gitcmd.NewCommand()
	switch refType {
	case "branch":
		cmd.AddArguments("branch")
	case "tag":
		cmd.AddArguments("tag")
	}
	stdout, _, err := cmd.AddArguments("--no-color", "--sort=-creatordate", "--contains").AddDynamicArguments(commitSHA).RunStdString(ctx, &gitcmd.RunOpts{Dir: repo.Path})
	...
}
实现
我们使用的是根正苗红的 SQLite 数据,因此只需要根据表结构放置触发器即可
CREATE TABLE IF NOT EXISTS commits(
    commit_id     INTEGER PRIMARY KEY AUTOINCREMENT,
    commit_hash   TEXT NOT NULL,
    parent_hash   TEXT,               -- only first parent
    generation    INTEGER,            -- NOT NULL after stage2
    repository_id INTEGER NOT NULL
) STRICT;

-- 索引略

CREATE TABLE IF NOT EXISTS ancestors(
    commit_id   INTEGER NOT NULL,
    exponent    INTEGER NOT NULL,     -- 2^n generation
    ancestor_id INTEGER NOT NULL,     -- aka. commit_id
    PRIMARY KEY(commit_id, exponent)
) WITHOUT ROWID, STRICT;

CREATE TRIGGER IF NOT EXISTS tgr_ancestor
AFTER UPDATE OF generation ON commits
FOR EACH ROW
WHEN NEW.parent_hash IS NOT NULL
BEGIN
    -- contents
END;
触发器绑定在 commits 表中的 generation 字段中, 因为这个字段的更新意味着父代已填充完毕、数据完整。
INSERT INTO ancestors(commit_id, exponent, ancestor_id)

WITH RECURSIVE skip_list_cte(commit_id, exponent, ancestor_id) AS(
    SELECT
        NEW.commit_id,
        0 AS exponent,              -- 亲爹记录是从 commits 表直接查来的
        c.commit_id AS ancestor_id
    FROM
        commits AS c
    WHERE
        repository_id = NEW.repository_id
        AND commit_hash = NEW.parent_hash

    UNION ALL                       -- 标准 CTE 语法、没有爆炸风险

    SELECT
        s.commit_id,
        s.exponent + 1,             -- 后续记录是把亲爹的记录复制,辈分 +1
        a.ancestor_id
    FROM
        skip_list_cte AS s
    INNER JOIN
        ancestors AS a
    ON
        a.commit_id = s.ancestor_id
        AND a.exponent = s.exponent
)

SELECT
    commit_id, exponent, ancestor_id
FROM
    skip_list_cte
WHERE
    ancestor_id IS NOT NULL;
结语
如果分支数量不多而提交数量很大,这样做没什么问题,时间换空间同时不用考虑一致性问题
但是对于那种一下子 23 万个标签的奇怪仓库,还需要进一步考虑:
- 每个提交携带布隆过滤器缓存 Reference?每次全量重刷?
- 非 First Parent Commit 怎么办?
- 能不能把上面的业务操作封装为扩展插件?
alsa.conf
发现我们 deepin 系统的音频子系统存在拧巴的依赖关系。
接口
当前播放音乐有以下几个相对底层的接口:
- ALSA 接口
- PipeWire 接口
- PulseAudio 接口
其中,ALSA 可以通过「配置文件」默认将播放转发到 PulseAudio 或 PipeWire 接口。 PipeWire 提供了 PulseAudio 兼容接口,以 pipewire-pulse 包的形式存在:
$ apt-file list pipewire-pulse
pipewire-pulse: /usr/bin/pipewire-pulse
pipewire-pulse: /usr/lib/systemd/user/pipewire-pulse.service
pipewire-pulse: /usr/lib/systemd/user/pipewire-pulse.socket
pipewire-pulse: /usr/share/glib-2.0/schemas/org.freedesktop.pulseaudio.gschema.xml
pipewire-pulse: /usr/share/pipewire/pipewire-pulse.conf

$ ls -l /usr/bin/pipewire-pulse
lrwxrwxrwx 7 root root 8 2025年 7月 2日 /usr/bin/pipewire-pulse -> pipewire
在纯正的 PulseAudio 系统上,ALSA 接口由 PulseAudio 兼容
$ apt-file list pulseaudio | grep /etc/alsa/co
pulseaudio: /etc/alsa/conf.d/99-pulse.conf      <<< 设置 alsa 默认输出

$ cat /etc/alsa/conf.d/99-pulse.conf
# PulseAudio alsa plugin configuration file to set the pulseaudio plugin as
# default output for applications using alsa when pulseaudio is running.
hook_func.pulse_load_if_running {
    lib "libasound_module_conf_pulse.so"        <<< alsa-plugins 提供
    func "conf_pulse_hook_load_if_running"
}

@hooks [
    {
        func pulse_load_if_running
        files [
            "/usr/share/alsa/pulse-alsa.conf"   <<< pulseaudio 提供
        ]
        errors false
    }
]
如果 ALSA 库连不上 PulseAudio(没有运行、或没有权限)就 fallback 到默认物理声卡。
我们的 25 系统默认同时预装 PulseAudio 和 PipeWire,具体到包是:
- pulseaudio
- pipewire
- pipewire-pulse
- wirepulmber
在 Ubuntu 新系统上还有一个额外的 pipewire-alsa 提供 ALSA 的兼容
$ apt-file list pipewire-alsa
pipewire-alsa: /etc/alsa/conf.d/50-pipewire.conf
pipewire-alsa: /etc/alsa/conf.d/99-pipewire-default.conf    <<< 设置默认转发
pipewire-alsa: /usr/lib/x86_64-linux-gnu/alsa-lib/libasound_module_ctl_pipewire.so
pipewire-alsa: /usr/lib/x86_64-linux-gnu/alsa-lib/libasound_module_pcm_pipewire.so
pipewire-alsa: /usr/share/alsa/alsa.conf.d/50-pipewire.conf
pipewire-alsa: /usr/share/alsa/alsa.conf.d/99-pipewire-default.conf
但是我们没有(pipewire-alsa 与 pulseaudio 两包冲突),
所以此时系统里的 APP 如果调用了 ALSA 相关接口播放,那处理路径为:
- ALSA 接口转发到 PulseAudio 接口
- PulseAudio 接口由 PipeWire 兼容
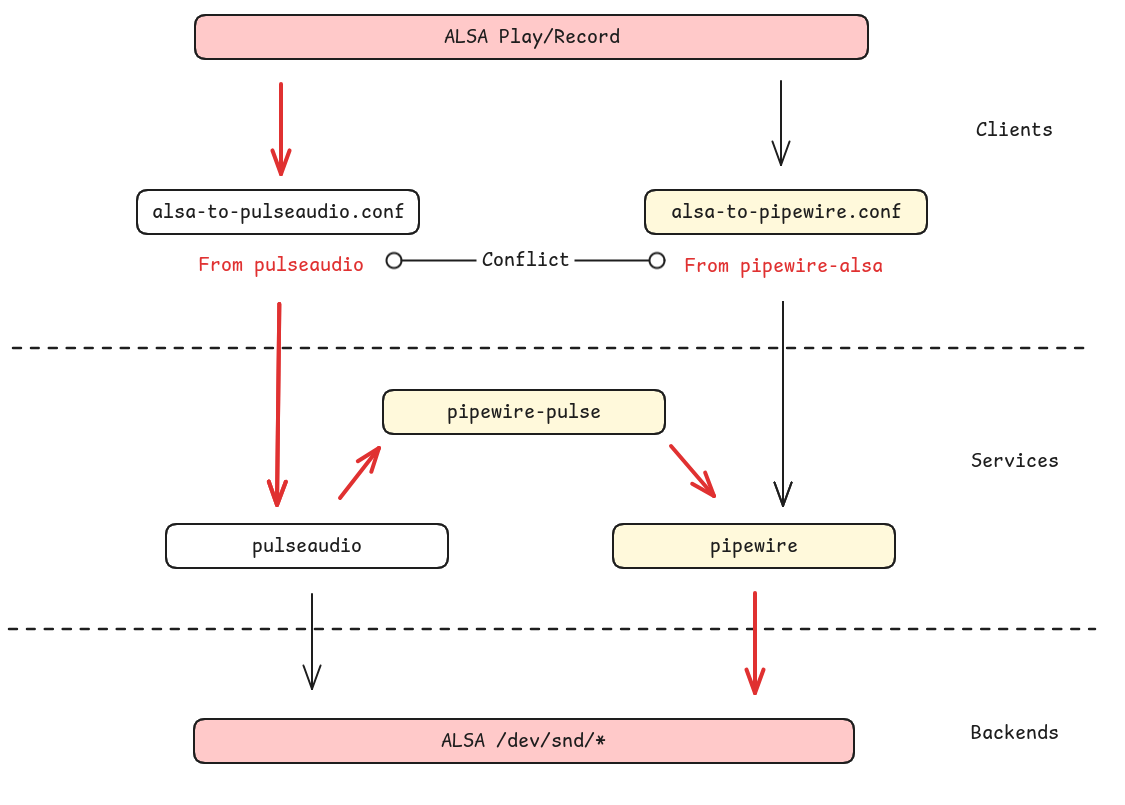
ALSA 转发的配置文件来自 PulseAudio,缺少转发就会让客户端尝试直接打开 /dev/snd
设备,而这些节点一般被 PipeWire 和 WirePlumber 进程占据,无法正常播放。
$ aplay xxx.wav
ALSA lib pcm_dmix.c:1000:(snd_pcm_dmix_open) unable to open slave
aplay: main:850: audio open error: 设备或资源忙
aplay
配置文件对当前系统最主要的功能是为 aplay 等提供 default 虚拟播放设备
$ aplay -L | grep -A 1 default
default
    Playback/recording through the PulseAudio sound server
例如安装 PulseAudio 时转发到 PA 的相关接口
$ strace -e openat aplay /usr/share/sounds/deepin/stereo/desktop-login.wav
openat(AT_FDCWD, "/etc/ld.so.cache", O_RDONLY|O_CLOEXEC) = 3
openat(AT_FDCWD, "/lib/x86_64-linux-gnu/libasound.so.2", O_RDONLY|O_CLOEXEC) = 3
openat(AT_FDCWD, "/lib/x86_64-linux-gnu/libc.so.6", O_RDONLY|O_CLOEXEC) = 3
openat(AT_FDCWD, "/lib/x86_64-linux-gnu/libm.so.6", O_RDONLY|O_CLOEXEC) = 3
openat(AT_FDCWD, "/usr/lib/locale/locale-archive", O_RDONLY|O_CLOEXEC) = 3
openat(AT_FDCWD, "/usr/share/alsa/alsa.conf", O_RDONLY) = 3
openat(AT_FDCWD, "/etc/alsa/conf.d", O_RDONLY|O_NONBLOCK|O_CLOEXEC|O_DIRECTORY) = 3
...
openat(AT_FDCWD, "/etc/alsa/conf.d/99-pulse.conf", O_RDONLY) = 3
...
openat(AT_FDCWD, "/lib/x86_64-linux-gnu/alsa-lib/libasound_module_conf_pulse.so", O_RDONLY|O_CLOEXEC) = 3
openat(AT_FDCWD, "/etc/ld.so.cache", O_RDONLY|O_CLOEXEC) = 3
openat(AT_FDCWD, "/lib/x86_64-linux-gnu/libpulse.so.0", O_RDONLY|O_CLOEXEC) = 3
alsa-lib
配置文件的解析在 alsa-lib 库,宏定义文件入口 /usr/share/alsa。
config_file_load 函数中使用 scandir64(alphasort64)
按照按照序号依次扫描加载以 .conf 结尾的配置。
$ ls /etc/alsa/conf.d/
10-rate-lav.conf      50-oss.conf          60-vdownmix.conf
10-samplerate.conf    50-pulseaudio.conf   98-usb-stream.conf
10-speexrate.conf     60-a52-encoder.conf  99-pulseaudio-default.conf.example
50-arcam-av-ctl.conf  60-speex.conf        99-pulse.conf
50-jack.conf          60-upmix.conf
配置文件默认是 + merge + create,同样的标识符号还有
- merge、? 缺省默认、! 覆盖(常用来设置默认音频设备)。
u 排在 i 后面,所以 99-pipe 和 99-pulse 配置文件同时存在时后者会覆盖前者。
pipewire-alsa
Debian 上游社区已经在 3 年前讨论过这个问题,此处的争执更多在语义完整性上: 当 PulseAudio 作为音频服务时,ALSA 被 PulseAudio 代理; 现在 PipeWire 接替了 PulseAudio,ALSA 应该被 PipeWire 直接代理还是因为兼容 PulseAudio 被兼容代理呢?
pipewire (0.3.60-1) unstable; urgency=medium

  * pipewire-alsa: conflict with pulseaudio. (Closes: #1013276)
      As long as the pulseaudio package is installed, ALSA clients will output
      via PulseAudio instead of PipeWire. This is due to the order of their
      respective configs files in /etc/alsa/conf.d/.

 -- Dylan Aïssi <[email protected]>  Fri, 11 Nov 2022 14:55:34 +0100

pipewire (0.3.64-1) unstable; urgency=medium

  * pipewire-pulse: recommends pipewire-alsa
      When the pulseaudio package is installed, all sound are routed through
      pulseaudio. PipeWire should mimic this behavior by adding the recommend
      between pipewire-pulse and pipewire-alsa. Thus all sound are routed
      through pipewire.

 -- Dylan Aïssi <[email protected]>  Tue, 17 Jan 2023 10:38:57 +0100

pipewire (0.3.64-3) experimental; urgency=medium

  * pipewire-pulse: do not recommend pipewire-alsa (Closes: #1029377)
  * Build a new metapackage pipewire-audio depending on recommended pipewire
      packages for a standard audio desktop use. Not knowing which packages
      to install is a common source of bug reports. This metapackage should
      help users to have a working configuration.

 -- Dylan Aïssi <[email protected]>  Tue, 24 Jan 2023 10:43:23 +0100
- https://bugs.debian.org/cgi-bin/bugreport.cgi?bug=1013276
- https://bugs.launchpad.net/ubuntu/+source/pipewire/+bug/1975823
- https://gitlab.freedesktop.org/pipewire/pipewire/-/issues/2255
- https://bugs.debian.org/cgi-bin/bugreport.cgi?bug=1029377
linyaps
测试时发现当前系统不装 pulseaudio 时 deepin-music 也正常工作, 咨询了玲珑组发现这里没怎么处理,运行时塞了一大堆东西进去。
$ ll-cli ps
应用              容器ID        进程ID
org.deepin.music  3149aa74d04a  7967
$ ll-cli enter org.deepin.music
(18280) ./libs/linglong/src/linglong/cli/cli.cpp:870 select container id "3149aa74d04ae73312c289b838050ee5873bea05db2c1715b92ecd3f1b9deab7"
$ cd /etc/alsa/conf.d/
$ ls -al 99-pulse.conf
lrwxrwxrwx 1 nobody nogroup 38  7月  2  2025 99-pulse.conf -> /usr/share/alsa/alsa.conf.d/pulse.conf
$ dpkg -S 99-pulse.conf
pulseaudio: /etc/alsa/conf.d/99-pulse.conf
因为配置文件转发在,绑定的 /run/user/1000/pulse/ 套字节也在,所以很不好的正常运行了。
New MkDot
MkDot 是一款 dotfiles 安装小工具,用于以较低的精神成本初始化新 Linux 系统。 这个帖子是一个伪实况,记录了小工具的构思及实现过程。
2026 年 1 月 6 日
需求
围绕 dotfile 为主题有几个概念我不喜欢,第一个是「管理」,其中 70% 是「同步」 10% 是「安全」。在我这里认为不对所以完全不需要考虑:
- 绝大多数同步依赖 Git,但是我并不觉得 Git 适合保存配置文件
- 配置文件放在 GitHub 不仅会在国内有访问问题,公开配置也放不了密钥
另一个概念还是「管理」,但是更偏向「功能」或者说工具「定位」,经过观察:
- 我的配置最多 200 行,用不着为此阅读 2000 字的文档学习一个似是而非的教程
- 再复杂的 dotfile 管理工具也不可能全自动托管,除非全部底裤交给 Nix
目前我有一个 U 盘,每次装系统手动复制一些文件过去。 因此小工具只需要把配置文件复制到正确的位置就能满足我的日常需求。
功能
脑海里浮现了一些功能相似的系统组件:cp、ln 和 install:
$ busybox install --help
BusyBox v1.37.0 (2025-12-16 14:19:28 UTC) multi-call binary.

Usage: install [-cdDsp] [-o USER] [-g GRP] [-m MODE] [-t DIR] [SOURCE]... DEST

Copy files and set attributes

	-c	Just copy (default)
	-d	Create directories
	-D	Create leading target directories
	-s	Strip symbol table
	-p	Preserve date
	-o USER	Set ownership
	-g GRP	Set group ownership
	-m MODE	Set permissions
	-t DIR	Install to DIR
其中的部分内容对本工具来说多余,比如 install 的权限和用户(直接复制就好), 剩下的部分直接照搬过来:
$ mkdot -h
usage: mkdot [-fins] TOPIC... BASE
   or: mkdot [-fins] -t BASE TOPIC...

install dotfiles from TOPIC(s) to BASE

  -f      overwrite existing files (default)
  -i      prompt before overwriting (interactive)
  -n      no overwrite, skip existing files
  -s      create symbolic links instead of copying
  -t BASE specify BASE directory for all TOPICs
参考知名备份工具 restic,它在工作时有三个参数:数据、动作、对象:
$ restic --repo /tmp/backup backup ~/work
本文小工具只有一个安装动作;数据由 CWD 和调用时的 TOPIC 两部分组合而成; 对象 BASE 是我们安装的目标路径,一般默认是用户家目录, 但是应当认可接 sudo 后安装到 etc 或者其他位置也 Ok 所以不可省略。
实现
首先想到的是 Rust,但是又即刻冷静下来——错误处理、非 UTF-8 路径处理、体积控制等等, 我都不会哈哈!PS:真的有人忍心为功能这么小的工具上 clap 和 thiserror 吗?
用 C 结合 POSIX 标准库搓搓,当当当当!顺便用 bats 套件糊了测试。
安全
搜了一下找到一个看起来信任度、维护度很高的 gocryptfs,文档也很完善
# 虽然是 go 写的但源里有
$ doas apk add gocryptfs

$ gocryptfs -speed
gocryptfs v2.6.1; go-fuse [vendored]; 2026-01-15 go1.25.6 linux/amd64
cpu: 13th Gen Intel(R) Core(TM) i5-13420H; with AES-GCM acceleration
AES-GCM-256-OpenSSL             2730.45 MB/s
AES-GCM-256-Go                  5627.85 MB/s    (selected in auto mode)
AES-SIV-512-Go                   624.00 MB/s
XChaCha20-Poly1305-OpenSSL      1398.80 MB/s
XChaCha20-Poly1305-Go           2064.54 MB/s    (selected in auto mode)

# 需要两个文件夹,一个存数据一个当挂载点
$ mkdir cipher plain

# 初始化数据,设置密码
$ gocryptfs -init cipher

# 加载 fuse 模块、解密、挂载
$ doas modprobe fuse
$ gocryptfs cipher/ plain/

# 卸载,因为有 suid 所以不需要 root
$ fusermount -u plain
结语
似乎可以结束了,但是 fuse 看起来还挺好玩,不知道能不能做点东西。
Foot Size Debug
Foot 是一个备受推荐、「心智」完善的 Wayland 终端模拟器。 但是在 Cage 合成器上,一直有个底部间隙的问题: Black strip at the bottom · Issue #254 · cage-kiosk/cage
环境
$ cage -- foot

$ cage -v
Cage version 0.2.1

$ foot --version
foot version: 1.25.0 +pgo +ime +graphemes -assertions
当前使用的显示器并未设置缩放,参数结果如 wlr-randr 所示:
DP-2 "YHY TYPE-C DXXXR499046S (DP-2)"
  Make: YHY
  Model: TYPE-C
  Serial: DXXXR499046S
  Physical size: 350x200 mm
  Enabled: yes
  Modes:
    2560x1600 px, 60.000000 Hz (preferred, current)
  Position: 0,0
  Transform: normal
  Scale: 1.000000
  Adaptive Sync: disabled
先启动一个无关紧要的 Cage 作为 base 环境避免退出,
查看 XDG_RUNTIME_DIR 发现有 wayland-0,拉起一个 foot 进程:
$ export WAYLAND_DEBUG=1
$ export WAYLAND_DISPLAY=wayland-0
$ foot > foot.log 2>&1
日志
[2696020.284] {Default Queue}  -> wl_display#1.get_registry(new id wl_registry#2)
[2696020.312] {Default Queue}  -> wl_display#1.sync(new id wl_callback#3)
[2696020.446] {Display Queue} wl_display#1.delete_id(3)
Client 的日志打印,-> 是客户端的请求,其他是接收的事件。
为了方便把时间和 Quene 去掉,剩余的伪 FMT 如下:
{send ? " ->": ""}{interface->name}#{interface->id}.(args...)
When a client deletes an object that it had created, the server will send this event to acknowledge that it has seen the delete request.
TODO 为什么在 callback done 的事件到达之前 callback id 就双删了?
// src/wayland-client.c

WL_EXPORT struct wl_display *
wl_display_connect_to_fd(int fd)
{
    wl_map_init(&display->objects, WL_MAP_CLIENT_SIDE);
    wl_map_insert_at(&display->objects, 0, 0, NULL)         // id = 0
    display->proxy.object.id =
        wl_map_insert_new(&display->objects, 0, display);   // id = 1
在 libwayland 中,Client 侧 wl_display 全局对象的 id 始终默认为 1。
wl_registry#2.global(1, "wl_shm", 2)
  -> wl_registry#2.bind(1, "wl_shm", 2, new id [unknown]#4)
wl_registry#2.global(2, "zwp_linux_dmabuf_v1", 4)
wl_registry#2.global(3, "wl_compositor", 6)
  -> wl_registry#2.bind(3, "wl_compositor", 6, new id [unknown]#5)
wl_registry#2.global(4, "wl_subcompositor", 1)
  -> wl_registry#2.bind(4, "wl_subcompositor", 1, new id [unknown]#6)
...
wl_callback#3.done(197)       // 对应 .312 的 sync
  -> wl_display#1.sync(new id wl_callback#3)
wl_display#1.delete_id(3)
有了 wl_display 后可以起 wl_registry 对象进而注册其他对象(接口),
Client 这边有的绑了有的没绑。一般这里会阻塞一下确保 Server 消息处理、派发完毕。
To mark the end of the initial burst of events, the client can use the
wl_display.sync requestimmediately after callingwl_display.get_registry.
wl_display_roundtrip(wl_display)
    Block until all pending request are processed by the server

- wl_display_roundtrip_queue
- wl_display_sync               // sync 有点像 await
- wl_display_dispatch_queue
- wl_callback_destroy           // delete callback_id
到这里几个接口都绑好了,下面主要关注窗口相关的信息。
wl_output#17.geometry(0, 0, 350, 200, 0, "YHY", "TYPE-C", 0)
wl_output#17.mode(1, 2560, 1600, 60000)
wl_output#17.scale(1)
wl_output#17.name("DP-2")
wl_output#17.description("YHY TYPE-C DXXXR499046S (DP-2)")
wl_output#17.done()
屏幕缩放是 1 而且搜不到名字的杂牌,wl_output 是最好实现的 Wayland 接口。
  -> wl_compositor#5.create_surface(new id wl_surface#3)
  -> xdg_wm_base#12.get_xdg_surface(new id xdg_surface#24, wl_surface#3)
  -> xdg_surface#24.get_toplevel(new id xdg_toplevel#25)

  -> zxdg_decoration_manager_v1#13.get_toplevel_decoration(new id zxdg_toplevel_decoration_v1#26, xdg_toplevel#25)
  -> zxdg_toplevel_decoration_v1#26.set_mode(2)     // 客户端请求 SSD
  -> wl_surface#3.commit()

  -> wl_compositor#5.create_surface(new id wl_surface#27)
  -> wl_subcompositor#6.get_subsurface(new id wl_subsurface#28, wl_surface#27, wl_surface#3)
...
xdg_toplevel#25.configure(2560, 1600, array[4])
zxdg_toplevel_decoration_v1#26.configure(1)         // 合成器强制 CSD
xdg_surface#24.configure(198)
wl_surface#3 是主 surface 具有 toplevel,其下有若干 subsurface
wl_surface#3akaxdg_surface#24,xdg_toplevel#25wl_surface#27akawl_subsurface#28- …
-> xdg_surface#24.ack_configure(198) // ack
-> xdg_toplevel#25.set_min_size(10, 49)
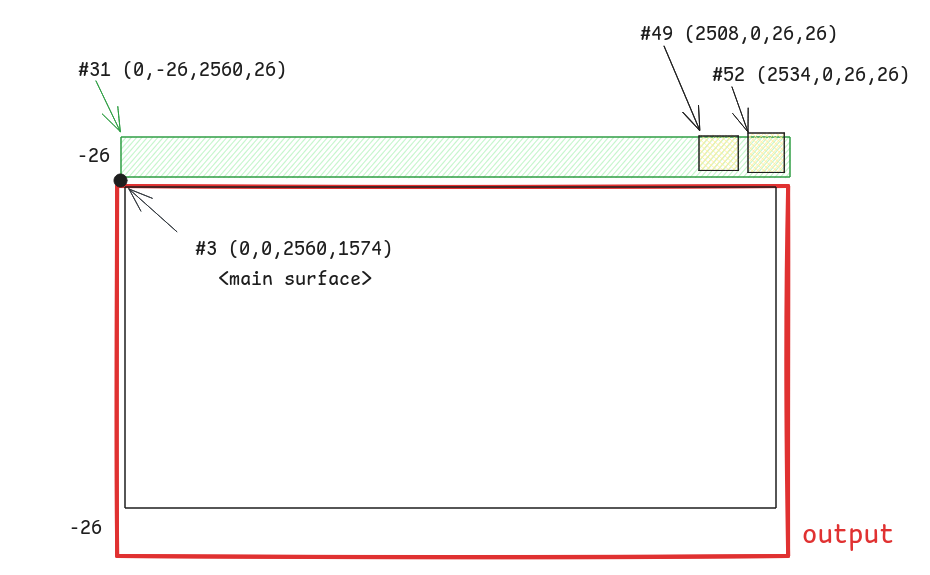
-> xdg_surface#24.set_window_geometry(0, -26, 2560, 1600)
-> wl_subsurface#31.set_position(0, -26)
-> wl_subsurface#34.set_position(0, 0)
-> wl_subsurface#49.set_position(2508, 0)
-> wl_subsurface#52.set_position(2534, 0)
Wayland 客户端不知道自己的坐标,但是 subsurface 知道自己在父节点上的相对位置。
  -> wl_shm#4.create_pool(new id wl_shm_pool#54, fd 15, 282624)
  -> wl_shm_pool#54.create_buffer(new id wl_buffer#55, 0, 2560, 26, 10240, 0)
  -> wl_shm_pool#54.create_buffer(new id wl_buffer#56, 266240, 26, 26, 256, 0)
  -> wl_shm_pool#54.create_buffer(new id wl_buffer#57, 272896, 26, 26, 256, 0)
  -> wl_surface#48.attach(wl_buffer#56, 0, 0)
  -> wl_surface#48.damage_buffer(0, 0, 26, 26)
  -> wl_surface#48.commit()
wl_shm_pool_create_buffer(
    pool,           // object
    offset,         // height * stride
    width,
    height,
    stride,         // align + width * bit
    WL_SHM_FORMAT
);
10240 / 2560 = 4,刚好 4 * 8 = 32 对应到 WHM 的颜色格式
| Argument | Value | Description |
|---|---|---|
| argb8888 | 0 | 32-bit ARGB format, [31:0] A:R:G:B 8:8:8:8 little endian |
下面的 26 26 大小需要 256 的 stride,这里涉及到对齐等其他设计 (TODO 为什么前面的就不需要)
所以此处的间隙就是窗口顶部的标题栏,在 Cage 中窗口的位置尽量贴近显示器
// view.c

static void
view_maximize(struct cg_view *view, struct wlr_box *layout_box)
{
	view->lx = layout_box->x;
	view->ly = layout_box->y;

	if (view->scene_tree) {
		wlr_scene_node_set_position(&view->scene_tree->node, view->lx, view->ly);
	}

	view->impl->maximize(view, layout_box->width, layout_box->height);
}
这里的 lx 和 ly 都是窗口在 output-layout 中的绝对坐标,没有考虑到后续窗口自身的 https://wayland.app/protocols/xdg-shell#xdg_surface:request:set_window_geometry
在 tinywl 中,可以看到可能更正常一点的排布(没有主动设置),因为默认自带偏移:
// types/scene/xdg_shell.c

static void scene_xdg_surface_update_position(
		struct wlr_scene_xdg_surface *scene_xdg_surface) {
	struct wlr_xdg_surface *xdg_surface = scene_xdg_surface->xdg_surface;

	wlr_scene_node_set_position(&scene_xdg_surface->surface_tree->node,
		-xdg_surface->geometry.x, -xdg_surface->geometry.y);
wlr_scene 接口没什么能改的,还是 WM 自己看着办吧
// types/scene/wlr_scene.c

void wlr_scene_node_set_position(struct wlr_scene_node *node, int x, int y) {
	if (node->x == x && node->y == y) {
		return;
	}

	node->x = x;
	node->y = y;
	scene_node_update(node, NULL);
}
测试时发现 Treeland 也有这个问题。 https://github.com/linuxdeepin/treeland/issues/744
Keyi-Sudo
大家好,我是安国立,网名 qaqland,平时主要活跃在 deepin 和 Alpine Linux 开源社区, 日常关注的方向是 Wayland、Git 等。
keyi-sudo 是一个我在 2025 年开始准备的项目,目的是提供轻量级 sudo 替代品,
满足日常使用的提权需求,同时保持简单易用性。
这次分享我最想讲的,不只是“我写了一个什么工具”,而是: 如何从 0 开始规划一个小项目,并把它推进到相对完整的生命周期。
问题与目标
良好的开端是成功的一半,在动笔之前,应该先明确当前问题和预期目标。
- 方向 & 竞品:要做什么、和谁不一样、项目的定位和边界在哪里、什么功能坚决不做
- 受众 & 需求:先确定目标用户范围,再由假想的用户确定需求的优先级,什么功能必须要有
- 收益 & 维护:能力越小责任越小,少做功能认真优化,维护压力小更不会弃坑
具体到 keyi-sudo 上,有以下几个方面的考虑:
Sudo 冗余 & OpenDoas 不足
Sudo 很强大但是也相对庞大,源码超过 500 个文件,安装体积不低于 1MB。 很多功能明显超出个人场景的实际需求:
- 企业级 I/O 审计与会话回放
- LDAP/SSSD 等目录服务集成
- 多插件链路扩展(主程序搭配一串插件)
OpenDoas 是 OpenBSD 的 doas 组件在 Linux 系统的移植版本,
虽然轻量但是功能欠缺,特别是少了 sudoedit 这样的借权编辑功能。
借权编辑文件的核心思路其实很朴素:
- 先用高权限把目标文件复制到临时目录
- 再用普通用户身份调用编辑器修改临时文件
- 最后回到高权限把内容覆盖写回原文件
对普通用户的日常编辑体验而言,借权编辑的直接收益是:编辑器进程始终运行在用户身份下, 用户自己的编辑器配置和家目录下的插件都能正常使用,不会因为提权到 root 而丢失。
我就是懒 & 反对无效密码
首先明确一个前提,ssh、login 解决的是“能不能进入系统”的问题; sudo、doas 解决的是“进入系统后,能否有更高权限”的问题。 这两层可能用的是同一套密码认证,但是职责不同,不能混为一谈。
我反对的不是密码本身,而是进入会话之后那种重复、机械性的密码输入。 对单用户的个人设备来说,这一步更多是在打断操作,而不是提升安全性。
一旦当前会话已经失守,再多输入一次提权密码,也通常保护不了系统和数据。 所以我更倾向于直接放开会话内提权,把复杂度留给前面的身份进入环节。
sudo 全量免密配置示例:
# /etc/sudoers
qaqland ALL=(ALL:ALL) NOPASSWD: ALL
doas 全量免密配置示例:
# /etc/doas.conf
permit nopass qaqland as root
不服就干,学习的好机会
认识世界是为了改造世界。践行黑客精神。
设计与实现
keyi 支持三种运行模式:命令执行、借权编辑、交互模式。
第一种是最基础、也是最常用的模式:在普通命令前面加 keyi,就可以直接以 root 身份执行:
$ keyi id -u
0
如果命令需要额外环境变量,也可以直接写在命令前面传进去:
$ keyi FOO=BAR printenv FOO
BAR
第二种是借权编辑,对应前面提到的 sudoedit 需求:改系统文件,但编辑器仍然跑在用户身份下:
$ keyi -e /etc/apt/sources.list
第三种是交互模式,适合连续执行多条管理命令,不用每次都重新起一条提权命令:
$ keyi -i
提权 & 鉴权
在 Linux 进程模型里,每个进程至少有两组身份:
ruid(Real User ID):启动进程的真实用户身份euid(Effective User ID):内核做权限判断时的实际参考身份
大部分程序两者相等,而 SUID 程序可以让 euid 在启动时变成文件属主,从而有提权能力。
SUID(Set User ID)是文件权限位的一种(例如 chmod u+s /path/to/bin),例如:
$ ls -l /usr/bin/sudo
-rwsr-xr-x 3 root root 306456 12月28日 16:19 /usr/bin/sudo
   ^ SUID 位
下面是一个最小示例,演示使用 euid 提权的流程:
#define _POSIX_C_SOURCE 200809L

#include <stdio.h>
#include <stdlib.h>
#include <sys/types.h>
#include <unistd.h>

int main(void) {
	uid_t ruid = getuid();
	uid_t euid = geteuid();
	printf("before: ruid=%4d, euid=%4d\n", ruid, euid);

	// 常见于 SUID 程序: ruid=user, euid=root
	if (ruid != euid) {
		if (setuid(euid) != 0) {
			perror("setuid");
			return 1;
		}
		printf(" after: ruid=%4d, euid=%4d\n", getuid(), geteuid());
	}

	execlp("id", "id", "-u", NULL);
}
鉴权是为了在提权之前确认用户身份。“有”鉴权很关键,不然就是后门。
keyi-sudo 基于 0 配置原则,直接复用内核已经提供的文件权限判断。
方法很简单,把 keyi 可执行文件的属主设为 root,
属组设为信任组(比如 sudo 组),再配合 SUID 和执行权限位进行控制:
- 调用用户必须属于指定的信任组
- 对 group 保留
x权限 - 对 other 不给
x权限
这样一来,访问控制发生在程序启动之前。只有在组用户才能把程序运行起来, 这样复用了内核已有的权限检查机制,减少了额外策略的代码实现。
$ ls -l /usr/local/bin/keyi
-rwsr-x--- 1 root anguoli 22856  3月11日 10:45 /usr/local/bin/keyi
         ^ 其他用户没有执行权限
提权命令流程
-
解析参数/模式
- 用户输入类似:
keyi FOO=BAR id - 先把前面的
NAME=VALUE环境变量识别出来,再识别模式(默认是执行命令)。
- 用户输入类似:
-
读取当前身份信息
- 读取 ruid/euid(谁在调用、程序当前以谁运行)。
- 读取调用者用户名(用于日志)。
-
做安全前置检查
- 检查程序是否真的在预期的提权状态(euid 应该是 root)。
- 检查可执行文件权限位是否符合要求(避免权限扩散)。
-
重建安全环境
- 清空当前环境变量(
clearenv)。 - 只设置必要变量:
USER/LOGNAME/HOME/PATH/LANG(以及可选TERM)。 - 目的:减少环境注入风险。
- 清空当前环境变量(
-
应用用户传入的环境变量
- 把命令行里
NAME=VALUE写回新环境(仅用户显式传入的)。
- 把命令行里
-
切到高权限身份
- 调用
initgroups/setgid/setuid切换到目标高权限身份。 - 到这一步,后续命令就是以高权限运行。
- 调用
-
写审计日志
- 用
syslog(LOG_AUTH)记录:谁、在什么目录、以谁的身份、执行了什么命令。
- 用
-
执行目标命令
execvp()启动真正命令(如id、cat等)。- 成功则当前进程被新命令替换;失败则报错退出。
借权编辑文件
相比 sudo,keyi-sudo 的借权编辑实现更简单,而且做了很多取舍:
目标文件必须已经存在,不做“新建文件”等语义
keyi -e 只能修改已有系统文件,不负责创建新文件,实现中直接以读写方式打开目标文件。
int src = open(path, O_RDWR | O_NOFOLLOW | O_CLOEXEC);
失败大部分情况下有以下几种情况,每种情况都不好处理:
- ENOENT 文件不存在:用户输入正确吗?是否应该创建新文件?如果创建又失败了,用户该怎么办?
- EISDIR 目标路径是个目录:应该编辑目录下的所有文件吗?
- EACCES 或其他打开失败:原因可能并不单一,例如权限策略拒绝、只读文件系统、挂载选项限制等。
为这些失败场景扩展交互逻辑会明显抬高复杂度。所以 keyi-sudo 选择直接拒绝并报错,
要求用户先确认目标路径满足前提条件,例如文件已经存在、路径不是目录;
其他不满足前提的情况也交由调用者先处理。
这样做的好处是边界清晰透明,行为可预期,代码更好写也更容易做收敛。
仅支持单文件编辑,不支持一次编辑多个文件
这也是一个刻意的取舍:多文件编辑很难给出“原子提交”语义。 例如同时编辑 3 个文件,如果第 2 个写回失败,就会出现一个现实问题: 前面成功写回的文件要不要回滚?如何保证回滚一定成功?
在缺少完整事务机制(临时快照、回滚日志、失败恢复策略)的前提下, 多文件编辑“看起来方便”,但会把一致性和复杂度大幅拉高。 所以 keyi-sudo 当前版本只支持单文件借权编辑:
- 成功路径更短,异常分支更少。
- 用户对结果的预期更明确:一次只处理一个文件,失败时也只需要关注这一个文件的状态。
- 维护成本更低,不需要在工具层面模拟半套事务系统。
代码之外
当 keyi-sudo 代码基本完成后,接下来还要准备很多工作:
- README.md、SKILLS.md、CONTRIBUTING.md 文档等等
- shell-completion 终端补全
- man 手册页
- 单元测试、集成测试
- CI/CD 与质量检查
- 相关构建流程及发行版打包
- 向大家介绍(就像此刻这样)
当然少不了维护和迭代,各种改代码修 bug、适配更多发行版等等。
到这里差不多就完成了一个项目的起步,希望大家乐在其中、玩得开心。
// EOF
2026
每年结束回望的时候,不由得很失落,所以不如每年的总结就写写新年目标好了!
新年目标当然要写在新年的 SUMMARY 里、写在 2026 的开头。
内核补丁
2026 年承接 2025 年的一个内核补丁,希望能有机会做 10 个。 好吧是在说大话,能有 1-3 个就满足了。
Alpine Linux
去年在打包仓库有 166 个提交,今年稳住 200 个应该问题不大。 按照这个速度估计,2027 年可以尝试申请 Committer。
Wayland
2025 年年初的时候突然发现自己能看懂 wlroots 源码了,26 年应该可以把 WM 搓出来。
这里希望能把相关文档和教程翻修一下,做点小工具和朋友主持一次开源之夏的项目。
Git
去年发现 Git 一个 BUG(也许是),希望能学习下邮件列表并围绕这个问题练练手。
GitWeb 数据结构基本成型,网站就用 Rust 随便糊一糊,心情好的时候应该也不难做。
音频方面
26 年不出意外 PulseAudio 就要官宣倒闭了(除了一些小工具和客户端的部分), 不知道能不能做点啥,比如埋点土帮帮忙?
这一年肯定要学会 PipeWire 相关,这是我们的主要目标排在首位。 有很多角度可以下手学习:
- 配置文件
- 生命周期
- 数据结构
- 协议接口
- WirePlumber
希望能在社区混个脸熟,修几个 Issues 然后自己写点文档。
最后但也是重要的
许愿 12 点之前甚至 11 点爬上床开始早睡早起!
2026-01
1 月受到某 suit 事件的影响整体不太顺利,总觉得本月什么也没干就结束了。
mkdot
观察了一下,可以考虑开个 dotfile 管理的新坑。特点是只负责安装,不负责同步备份,
因此剩下的逻辑如 ln -s 或 install 般简单。
https://github.com/qaqland/mkdot
同步备份是一件很复杂的事情,不应该耦合在我对 dotfile 的需求中
- 绝大部分配置文件不需要 Git 历史记录,也不应该被 Git 管理
- 部分敏感数据放置在 GitHub 等开放平台不合适或者不方便
overthinkin
尝试把之前写的小工具们搓到一起。
aports
GTK2 清理工作稳步推进中,Python 会再次测试并尝试关单。 本月勤劳的 Alpine Linux 维护人 cece 离开了项目,感谢付出、希望 ta 能开心。
- https://gitlab.alpinelinux.org/alpine/aports/-/work_items/17848
- https://gitlab.alpinelinux.org/alpine/aports/-/issues/17558
- https://gitlab.alpinelinux.org/alpine/aports/-/merge_requests/95104
- https://gitlab.alpinelinux.org/alpine/aports/-/merge_requests/95130
- https://gitlab.alpinelinux.org/alpine/aports/-/merge_requests/95391
- https://gitlab.alpinelinux.org/alpine/aports/-/merge_requests/95440
- https://gitlab.alpinelinux.org/alpine/aports/-/merge_requests/95510
- https://gitlab.alpinelinux.org/alpine/aports/-/merge_requests/95659
- https://gitlab.alpinelinux.org/alpine/aports/-/merge_requests/95660
- https://gitlab.alpinelinux.org/alpine/aports/-/merge_requests/95662
- https://gitlab.alpinelinux.org/alpine/aports/-/merge_requests/95744
- https://gitlab.alpinelinux.org/alpine/aports/-/merge_requests/95745
- https://gitlab.alpinelinux.org/alpine/aports/-/merge_requests/95746
- https://gitlab.alpinelinux.org/alpine/aports/-/merge_requests/95757
- https://gitlab.alpinelinux.org/alpine/aports/-/merge_requests/95768
- https://gitlab.alpinelinux.org/alpine/aports/-/merge_requests/95817
- https://gitlab.alpinelinux.org/alpine/aports/-/merge_requests/96185
- https://gitlab.alpinelinux.org/alpine/aports/-/merge_requests/96186
- https://gitlab.alpinelinux.org/alpine/aports/-/merge_requests/96187
- https://gitlab.alpinelinux.org/alpine/aports/-/merge_requests/96188
- https://gitlab.alpinelinux.org/alpine/aports/-/merge_requests/96293
- https://gitlab.alpinelinux.org/alpine/aports/-/merge_requests/96342
- https://gitlab.alpinelinux.org/alpine/aports/-/merge_requests/96681
- https://gitlab.alpinelinux.org/alpine/aports/-/merge_requests/96683
- https://gitlab.alpinelinux.org/alpine/aports/-/merge_requests/96690
- https://gitlab.alpinelinux.org/alpine/aports/-/merge_requests/96719
- https://gitlab.alpinelinux.org/alpine/aports/-/merge_requests/96723
- https://gitlab.alpinelinux.org/alpine/aports/-/merge_requests/96772
radxa q6a
已经在脑海里做好镜像了!虽然还没做好。
- dd 搞个文件,弄两个分区并挂载到目录
- rootfs 解压到根,从厂商镜像里把内核相关文件抠过来
- 挂载 dev sys 等,chroot 进入系统初始化配置
接下来就是和树莓派一样的过程了, 镜像刷到 tf 卡然后:插电、开机、午安大电牛,轻松点亮。
但是我应该先把 setup-alpine 项目和 aports 的 bootstrap 过程逻辑完整过一遍。 不然出的镜像太不负责任(心里没底),这也是我下个月的主要目标。
donation
找到了 nixd
life
早睡早起大失败,下月再战。
2026-02
wayland
启动台、Bar、Switcher 这三个可以整合一起到 Bar 中,实现类似 CtrlP 的效果。 大概可以等 wless 完成后再考虑,其中 fzf 的模糊匹配功能最好独立为库。
- https://github.com/junegunn/fzf
- https://github.com/helix-editor/nucleo
- https://codeberg.org/adnano/wmenu
本月尝试对 Foot 在 Cage 下的异常底部间隙进行分析,当前正在看 wlroots 的 Scene 接口,应该下个月就能基本完成理解。
happy new year
新年快乐!谢谢大家照顾。还在网上领到了不少红包。
overthinkin
之前做的提权小工具 soda 改名为 keyi (可以)并完全重置。 世俗的视角看,keyi 存在很多问题:
- 无密码验证,只要在 wheel 组的用户都能直接提权
- 编辑器命令注入,修改 EDITOR 就能多编辑额外的文件
但是这不影响 keyi 项目本身,权限设计如此,编辑器也是跑在普通用户。
alpine
纯摸鱼基本没有参与活动,有点讨厌 Vibe 参与的 Rust 项目,不想给 LLM 擦屁股。
- https://gitlab.alpinelinux.org/alpine/aports/-/merge_requests/96772
- https://gitlab.alpinelinux.org/alpine/aports/-/merge_requests/97066
- https://gitlab.alpinelinux.org/alpine/aports/-/merge_requests/97096
- https://gitlab.alpinelinux.org/alpine/aports/-/merge_requests/97101
- https://gitlab.alpinelinux.org/alpine/aports/-/merge_requests/97123
- https://gitlab.alpinelinux.org/alpine/aports/-/merge_requests/97283
- https://gitlab.alpinelinux.org/alpine/aports/-/merge_requests/97783
- https://gitlab.alpinelinux.org/alpine/aports/-/merge_requests/97875
- https://gitlab.alpinelinux.org/alpine/aports/-/merge_requests/98138
- https://gitlab.alpinelinux.org/alpine/aports/-/merge_requests/98156
- https://gitlab.alpinelinux.org/alpine/aports/-/merge_requests/98157
- https://gitlab.alpinelinux.org/alpine/aports/-/merge_requests/98158
其中 pref、py-spy、television 三个项目测试都炸了一堆,后面看看怎么修(哭)。
donation
作者是我微信好友,他另一个叫做《程序员做饭指南》的项目可能更出名一点。
有些事情快忘了为什么不做了,因此必须做一个 checklist 持续观察依赖关系。
radxa
现在手里有 q6a 和 o6n,计划做点镜像
- https://gitlab.alpinelinux.org/alpine/alpine-conf
- https://gitlab.alpinelinux.org/alpine/mkinitfs
- https://gitlab.alpinelinux.org/alpine/aports/-/tree/master/scripts
- https://docs.kernel.org/admin-guide/efi-stub.html
- https://docs.kernel.org/admin-guide/initrd.html
- https://git.alpinelinux.org/aports/tree/main/linux-lts?h=master
- https://docs.radxa.com/dragon/q6a
bushi
- bushi-index
- bushi-web
- bushi-hook(scan)
wless
- foot resize debug
- fork wmenu
- sway scene
- rename
2026-03
3 月的记录有点懈怠了,一方面是公司最近业务繁忙,另一方面是自己的作息没控制好。
WHLUG
包含以下要素:
- 金主爸爸模态跃迁以及全找工程师
- 穿着龙芯连帽衫的肥猫老师
- 质感很不错的 Framework 笔记本
- 感情深厚的 deepin 老用户
Alpine Linux
托管在海南机房的电脑系统爆炸了,寄回来还没修好,下个周五晚上再尝试尝试。
据说要议会解散 TSC,消息准确但是流程不公开,作为中国人有点反感这种行为。
在 LLM 的帮助下修好了 televison 的若干测试错误, 不过最近在连续遇到了好几个错误之后有点懈怠了,事情好多好累。
- https://gitlab.alpinelinux.org/alpine/aports/-/merge_requests/98138
- https://gitlab.alpinelinux.org/alpine/aports/-/merge_requests/98332
- https://gitlab.alpinelinux.org/alpine/aports/-/merge_requests/98797
- https://gitlab.alpinelinux.org/alpine/aports/-/merge_requests/99281
- https://gitlab.alpinelinux.org/alpine/aports/-/merge_requests/99716
- https://gitlab.alpinelinux.org/alpine/aports/-/merge_requests/99718
overthinkin
非常高兴去年可以创建这样一个仓库,仓库名称也已经获得当事人的许可。 最近这个月仓库里新加入了几个好玩的东西:
- hook-wl-signal 观察 wlroots 的 signal-emit 事件和回调函数
- im-wl-protocol 基于 Wayland 协议的本地聊天室
- jump-or-exec 拉起或新建指定窗口(基础款)
- mac-snd-info macOS 下对声卡属性的观察
- pipewire-suspend PipeWire 中声卡的挂起(暂停)方法
wayland
基于前文摸索,现在已经差不多了解了 50% 的基本 wayland 知识。 准备下一步做个真正做点可日用的东西,比如三合一的 bar:
- 启动器
- 状态栏
- 窗口切换
虽然还没开始做但是下个月完成应该没问题(等来了 wlroots-0.20 发布)。 完成之后再回头把 t-rec 的 Wayland 录屏功能补了。
目前来看开源之夏的 deepin & Wayland 活动应该是泡汤了。
misc
- Copilot 会员还挺划算吧,也挺好用的
- 搜包网站有点犹豫了,SQLite 的 fts5 是按照 token 来的,天生和子串匹配不搭边
- 复刻 fzf 算法也有点动力不足,没什么使用场合先算了
list
- radxa 镜像需要等 qemu-openrc 修好 https://gitlab.alpinelinux.org/alpine/aports/-/issues/17751
- wless 改名,同时给 bar 起个新名字,bar 完成
donation
fcitx5
2026-04
清明节假期
首先到来的是清明节假期,虽然什么事都没做,但一直思考总有收获。
- n5105 小电脑自从 2 月份机房失联后一直在抢救,终于救回来了!
- 100% 全 vibe 了一个持有 pty 的 ai 工具,可以帮助用户从 vim 中「脱困」
- 思考了我应该/可以/能够/值得做的 ai 工具的方向:Git 提交信息辅助
- WM 的快捷键再次重构,这次的结论是使用 Lua 绑定最合适
Git 提交信息辅助
有好几个特点只有当前场景符合:
- 成熟,以至于没人做。大家顺手用 cc 或 opencode 一起生成了
- 工具调用稳定。就是 read 和一些 git 操作,非常安全
- 可以在提交信息里打广告
- 可以把完整的 agent 走一遍,什么记忆、子 agent、skill 等等都能用得上
- 扩展方便。将来可以做到代码审查里
- 基于git仓库的上下文记忆非常好处理,不用担心session的恢复及匹配问题
使用 rig-core 和 rustyline 作为核心依赖,配置文件不单拆和 gitconfig 放一起
更新:只用到了最基本的工具调用和人工 Agent 编排,基本完成了上述目标。
- Summary Agent 总结并缓存项目整体架构与模块划分
- Style Agent 理解 Commit 约定与文法风格
- Commit Agent 分析
git-diff并结合项目信息进行理解 - Message Agent 综上所述给出提交信息的参考输出
Vibe
本月深入体验了 Vibe Coding,然而并不总是开心的:
- 价格昂贵。到现在为止国产模型一天也需要 20 元的 token
- 缺少思考。LLM 不计成本的写,也不考虑方向,完全不适合新项目开荒
- 疲于审阅。作为代码的第一责任人,我还是肉眼凡胎
作为对比,Vibe 与色情产业有点相似:
- 模型分为国产模型和非国产,有的名不副实
- 有各种中转站和灰色产业
- 让人痛苦的上瘾、又不得不消费
- 影响社会关系(同时也也影响就业岗位)
WM 快捷键
这是我纠结时间最长的一项任务,但从目前来看应该够用
function jump_or_exec(pattern, command)
    ...
    ky.spawn(command)
end

ky.bind(logo + shift, "1", jump_or_exec, "^foot\n", "foot")
ky.bind(logo, "enter", function() ky.spawn("foot") end)
从处理逻辑上看,Alt + Tab 与 jump-or-exec 没有区别, 甚至后者更复杂一点,因此可以抽象给 Lua 这边去做过滤器。
计划五一期间用 SDL 把 demo 做出来,有些细节还没想好,比如:
- 触发回调函数后再绑定的快捷键?
- 按键 release 应该在何时处理。
Alpine Linux
本月基本处于躺平状态,很没有责任心了也是:
- https://gitlab.alpinelinux.org/alpine/aports/-/merge_requests/101547
- https://gitlab.alpinelinux.org/alpine/aports/-/merge_requests/101544
- https://gitlab.alpinelinux.org/alpine/aports/-/merge_requests/101543
- https://gitlab.alpinelinux.org/alpine/aports/-/merge_requests/100846
- https://gitlab.alpinelinux.org/alpine/aports/-/merge_requests/100842
- https://gitlab.alpinelinux.org/alpine/aports/-/merge_requests/100408
- https://gitlab.alpinelinux.org/alpine/aports/-/merge_requests/100267
- https://gitlab.alpinelinux.org/alpine/aports/-/merge_requests/100187
- https://gitlab.alpinelinux.org/alpine/aports/-/merge_requests/100186
RISCV WuHan Meetup
新认识了传说中的多多冰、Z572、Blockcity 等群友!分到了 RV 多多冰老师的生日蛋糕。
Windows
已严肃安装 Windows 11 体验最新最潮的操作系统,还挺好用的至少安装包随便跑。 群友友情价 1200 py 交易到了 16G * 2 的内存条,5 月也许可以玩一下守望先锋。
PLAN
事情突然变多了,原本只有两个现在倍增
- 小屏幕优化的 Wayland WM
- GitWeb
- Vibe Commit Message
- IRC Bot
本月无 Donations 也无 Overthinkin,
2025 Summary
2025 年可能是过去若干年中变动最大的一年
乙巳春节
这年的春节是早早的 1 月 29 日,不过我 25 日顺利到家。
路程的上半段是到芜湖的高铁,高铁站亮堂堂很是漂亮,但大厅里鲜有二三十岁的年轻人, 问了本地友人说是刚好错过年轻人与学生的两波高峰,现在人少少看起来年龄稍微偏老。
下半段再坐绿皮车的卧铺到家。本科头两年我也经常坐绿皮卧铺上学,但这一班格外破旧,可能平时闲置春节上工。 即便如此,还是有很多人买不到票——在车上的人也没票,往往只买一站,然后挤一挤去 6 号硬座车厢补票; 这是相当不容易,车厢挤满了想补票的人群,大过年上班的乘务员有点压力, 但大家都是赶着回家的人,带着整整一年的期望与等待,倒也不会有什么治安问题。
我对放假很恍惚,无论是暑假寒假、还是普普通通的周末,这种恍惚感不知道从何时起。 小时候我不擅长语文,背诵是浪费时间怎么都记不住,40 分钟的语文早读一段话都难背, 写作更是周末一个下午都写不好(不知道现在的我有无达到初中同学平均水平), 儿时不知道什么叫抑郁,对着方格纸总是发呆,等熬完了作文、睡觉上学又是周而复始。
作业完成了也不知道干什么,这个问题影响了我的前二三十年。 小学二年级在我完成作业后,家长额外要求把语文笔记进行背诵——那我为什么要专心完成作业呢? 春晚没怎么看,但是那首歌还挺好,“小时不识月,呼作白玉盘”, 还好跨过时间,我和小时候看到了同一个月亮,真好,时间也可以折叠。
以上这段是春节时写的,不忍心删掉就复制了过来
上班
不劳动的人会逐渐废掉,所以劳动是人的基本权利。 劳动收获就好像有些公司的内账和外账,身临其中才知道内账记了什么。
来读研的主要目的是之前觉得自己能力不足,需要继续学习(无论学什么)。 还好我在读研这三年发现了有意思的事情,闲暇时间除了内耗都扑在了上面。
感谢导师感谢学校感谢课题组同门不杀之恩,赶在最后几个月大小论文顺利达标。
顺利入职深之度也就是 deepin 家,希望明年可以更适应工作环境,搞点新东西。
自己已经做了好几年的小项目「窗管」、「GitWeb」在 2025 年都有了大进展。 虽然外表看起来还是都不能用,但是预计 2026 年都没什么问题了!
Alpine Linux
这年基本算成为了一名普通打包工,2025 年打包提交共 166 个,其他提交不到 10 个。 希望明年能维持在 150-200 个提交之间。这年挖了不少大坑没填,比如 Python 等。
不知道能不能把搜包网站升级一下(说是升级,要改基本就是重写了)
- 跨发行版搜索软件包
- 软件包内文件路径搜索
- 正规搜索筛选条件
- 增加信息统计面板
由于自己的窗管和 GitWeb 都没做完,有部分计划需要 2026 年年底再看了。
2025-10
Alpine Linux
- https://gitlab.alpinelinux.org/alpine/aports/-/issues/17499
- https://gitlab.alpinelinux.org/alpine/aports/-/issues/17605
- https://gitlab.alpinelinux.org/alpine/aports/-/merge_requests/90725
- https://gitlab.alpinelinux.org/alpine/aports/-/merge_requests/91364
- https://gitlab.alpinelinux.org/alpine/aports/-/merge_requests/91610
- https://gitlab.alpinelinux.org/alpine/aports/-/merge_requests/91611
- https://gitlab.alpinelinux.org/alpine/aports/-/merge_requests/91612
- https://gitlab.alpinelinux.org/alpine/aports/-/merge_requests/91614
- https://gitlab.alpinelinux.org/alpine/aports/-/merge_requests/91664
- https://gitlab.alpinelinux.org/alpine/aports/-/merge_requests/91692
- https://gitlab.alpinelinux.org/alpine/aports/-/merge_requests/91928
- https://gitlab.alpinelinux.org/alpine/aports/-/merge_requests/91929
- https://gitlab.alpinelinux.org/alpine/aports/-/merge_requests/92020
原计划在国庆假期把 Python 相关的包努力做一做,setup.py install 相关函数将要在
月底废弃,但是经过努力决定开摆,原因有下:
- 当前在不测试的情况下完全无法分辨是否依赖有缺失
- 很多上游不着急,构建系统的切换还是上游做合适
- 缺少项目经验,不明白 nox、pytest、uv 等的工作原理
- 使用的 py3-gpep517 脚本协议错误,提了修改没人管
这个月 pmos 的人引入了 systemd 子包功能到 abuild,也算是对社区的又一次冲击(摊手), 不知道 WHLUG 能不能做个闪电分享讲讲这些事:
- https://gitlab.alpinelinux.org/alpine/abuild/-/merge_requests/272
- https://gitlab.alpinelinux.org/alpine/abuild/-/merge_requests/433
- https://gitlab.alpinelinux.org/alpine/aports/-/merge_requests/91516
- https://gitlab.alpinelinux.org/alpine/aports/-/merge_requests/84539
- https://gitlab.alpinelinux.org/alpine/aports/-/merge_requests/85504
- https://github.com/systemd/mkosi/pull/3781
Wless & Wayland
隔了一整个 8 月和 9 月没写,之前写的代码有点看不懂了,于是也重新看。
- 在 sway 中 layer-shell 是挂在 output 下,渲染时 reparent 到 server
- 在 dwl 中 border 是挂在 client 下,对于我的场景应该适合挂在 output 里
wlr_scene_node_set_size需要考虑到 pending 状态(tinywl 的 resize 没考虑)
之前拆多文件是为了使用 AI 写代码理解方便,但是体验了 VSCode + cline + DeepSeek, 小几千行的情况下,单文件对 AI 和对我的原生 Vim 来说都更方便,我就改回去了。
协议 wlr output management 是为了客户端 Read 或者 Write 服务端的显示器设置
-
zwlr_output_manager_v1- request
create_configuration>>zwlr_output_configuration_v1 - request
stop - event
head>>zwlr_output_head_v1只读的广播,没什么逻辑 - event
done - event
finished
- request
-
zwlr_output_configuration_v1- request
enable_head>>zwlr_output_configuration_head_v1+zwlr_output_head_v1 - request
disable_head>>zwlr_output_head_v1 - request
apply - request
test - request
destroy
- request
-
zwlr_output_configuration_head_v1- request
set_{mode,position,etc.}
- request
-
https://wayland.app/protocols/wlr-output-management-unstable-v1
10 月用两个周末的时间完全重写了之前的配置文件(主要是快捷键)的逻辑,
大幅度依赖 getopt、getsubopt、wordexp 这三个标准库函数。
修改之后实现了两个目标:
- 决定把部分复杂功能从 WM 本体中丢出去,降低配置的复杂度
- 命令行与配置文件使用同一套解析函数
认真学习了 wlr_output_layout_output 相关内容(并不认真):
显示器的 enable 在非原生后端时可能会修改,但是如果 output 不在整个 layout 中,
我们也应该认为这个显示器是 disable 的。应用到具体场景就是用户的笔记本显示器熄屏,
此时物理上显示器连接,但是显示器没有真正投入使用,用户可能扣着盖子用外接屏幕。
Bushi & Git
重新审视了这个项目的整体架构,思考下一步真的要做什么。 项目已有的“祖先跳表”设计令人兴奋,但是内部数据的生成还是依赖 git-fast-export, 这不优雅:
- 很难控制 git-cli 本体的内存占用,据测算需要 800 Mb(使用 aports.git 仓库)
- 命令行输出的解析是用的手抠字符串,虽然能跑但相当原始
- 初始化更新和后续更新可能逻辑不一致,写两套函数无法接受
所以最好这里再细节一点。
先尝试的是字符串解析,尝试使用 nom 但阅读文档后发现,这个库必须先把字符串读取为
&str,这就很不合适,因为管道重定向是 Stream 流:数据量大、输出时间长、
不保证字符编码。目前也没有什么其他库做这件事很合适,所以搁置。
用原版 git-cli 和 libgit2 各做 1000 次提交差异对比,发现原版速度就是快一个数量级
export GIT_PAGER=cat
git diff --no-color --name-only "$commit_old" "$commit_new"
看了会儿 libgit2 的源码思考为什么如此慢。发现它读取 object-tree 这里可以改一下,
用 data 的 size 除以 oid_t + mode + 6,然后拿这个数值去初始化数组,
避免很多次 realloc。修改后对比测试,略有提升,效果微乎其微,平均百万次读取超大
object-tree 调用提升 10s(口算)。
- https://github.com/libgit2/libgit2/blob/58d9363f02f1fa39e46d49b604f27008e75b72f2/src/libgit2/tree.c#L405
- https://linux.die.net/man/3/realloc
- https://en.cppreference.com/w/c/memory/realloc
读取有 object 后的 diff 运算没有可以优化的地方,就是简单的双指针单向遍历。
所以还没什么其他加速思路。
从 git-sizer 程序的解析结果看,把仓库中所有的 object-tree 事先解析并塞到 SQLite 的方法会导致程序体积占用很大,预计有 20 倍的膨胀,所以不可取。理想预期:
- 【内存占用小】全程不超过 200 Mb,而且缓存大小可控
- 【硬盘占用小】因为必须保留原生 git-objects 做兼容,所以尽可能产物小于同期 fossil
- 【CPU 消耗低】初始化不作要求,查询时单线程可运行
- 【解析时间短】初始化时间低于 git-fast-export 耗时的三倍,查询时间低于 git-cli
下一步计划:当前的性能瓶颈有两个,object-tree 的 read 和 diff,它们被广泛压缩在 packfile 中,不仅 IO 紧张而且 CPU 紧张。但是逆转过来想,压缩本身也是一种信息? 可能需要写一点优化后的读取方法,在读取时抓取更多信息。
备用计划:手动封装 git
- 找个支持流式解析库,优化现在的 fast-import
- 魔改 fast-export 输出 json,然后接 serde::json
- 封装原版 git-diff-stat 用 nom
QT
发现一个 Bug,右键弹出菜单中,分隔线上的点击事件无效但会导致弹出菜单消失。 使用 AI 写了个复现小 demo,提交问题到了 QT 上游。
# 感谢子冲帮忙修复 LSP 爆红
sudo apt install libstdc++-13-dev
不知道下一步会不会学习 QT 做点小工具。
论文
导师喊我改论文,这让我非常难过,尽管我知道这件事情只要完成就再也不会有烦恼了。 但我还是很难过,无法诉说的压力和恐惧,让我没有失去了对生活 60% 的注意力和快乐。 有以下几个方面需要改:
- 标点符号、文字、句子之间的连贯性
- 图表、公式、大小写
好像没了。我尽量去做吧。祝我开心。
Vim
学到了 Vim 自带的 grep 命令,非常好用,再也不需要终端里查询复制到 Vim 中再打开了。
现在是接入了 ripgrep 日常使用,配置文件略微修改:
if executable("rg")
        set grepprg=rg\ --vimgrep\ --smart-case
        set grepformat+=%f:%l:%c:%m
endif
把之前在 Vim 上修的小补丁 cherry-pick 到了 NeoVim 上
- https://github.com/vim/vim/commit/ce4f9d2a1016ade19fa07c5b66e58eb084719192
- https://github.com/neovim/neovim/pull/36221
Misc
博客 or 主页
修好了个人主页,去掉万年不更新的 Hugo 放了个简单的 Html 单文件,CSS 是从之前的 hugo-rss-only 仓库薅来的,设计风格来自 Nginx 默认页面。
计划在以后的 hash 按照月为单位更新日志,有其他长短文字按照内容分类,也放这里。
FetchSrc
做了一个用于下载、缓存、解压源码的 rust 小工具 fetchsrc,我的 Option 和错误处理 经验还是太匮乏了,这里写的很吃力(和 shell 差不多吃力了!)。 后面有空找个开源项目,跟踪一段时间学习错误处理。
LSP
clangd 原来默认也会搜索 build/compile_commands.json,再也不抱怨 LSP 不干活了,
之前全靠软链接和 .clangd 配置文件苟活。
SSH
终于(又一次)理解了端口转发的方向
ssh [-L|-R] [FROM_IP:]FROM_PORT:DESTINATION:DESTINATION_PORT [USER@]SSH_SERVER
对于 -L 本地端口转发来说,流量从本地端口进入,转发到 DESTINATION,所以是 LOCAL
1024
本来想搭配“麒麟”这首歌做个混剪小视频,但是和 xingji 交流后发现代码提交截图 不适合做素材,远远不如画画、徒步等,所以还是算了。
Donations
这次选择了 asciinema 项目,恰好新版本发布。
捐款上也有一些小想法:
- 参与代码贡献的项目不捐:出力不出钱,比如 Alpine Linux
- 账面还有很多钱的不捐:钱不能解决这种维护问题,比如 libgit2
- 没用过 or 不好用的不捐:特指希望倒闭的 matrix
没事可以去 https://opencollective.com/search 逛逛,想想以后自己的项目怎么搞钱
如果 11 月没想好给谁就去订阅一下 LWN,或者给服务器加点钱什么的。
2025-11
wless
本月主要关注client的resize和output的frame事件之间的关系,相关参考内容有:
- https://github.com/DreamMaoMao/mangowc/issues/293
- https://github.com/swaywm/sway/blob/055be4ec35eec4eaaf066a18ccbf5132ebed0694/sway/desktop/output.c#L374
- https://github.com/swaywm/sway/pull/2072
- https://wayland.app/protocols/xdg-shell#xdg_surface:request:ack_configure
问题的矛盾在于窗口的大小和窗口的位置改变不同步,如果我想让窗口进入全屏:
- WM立即将窗口的左上顶点移动对齐到左上角
- WM请求窗口改变大小,此时窗口占据了1/4屏幕(举例)
- 窗口响应WM,变为全屏,此时窗口全面覆盖
窗口的位置是WM没有延迟随意操作的,而窗口的大小需要客户端自己去响应,两者几乎不会在同一帧完成。 在这个时间裂缝里,窗口从1/4到全屏不可避免的闪了一次。 还没想好怎么处理,可能需要卡住显示器,或者等窗口响应的pre-commit里再去改变位置。
12月应该没时间看,可能又要等到明年了。
bushi
nom似乎可以对stream进行解析,之前可能没注意到? 研究了一番放弃了这个灵车的想法!(见后)
从i5换到了n5105,耗时差不多是两倍:
git-log–stat 5m16s
git log --oneline --stat > /dev/null
git-fast-export 3m45s
git fast-export --no-data --fake-missing-tagger --signed-tags=strip --all > /dev/null
据研究packfile包含的压缩信息确实可用(好像废话,不然git是怎么把20G压缩到600M的)
git verfy-pack -v .git/objects/pack/pack-*.idx
但是没有稳定性保证,压缩的基准与提交顺序有关系但不保证, 高概率出现ABCD等多个tree都基于同一个base差值压缩的情况。 因此当前决定还是不做这个了, 我们还是愉快的攀附在git二进制文件上,对输出进行解析吧!
- 扫描所有refs,存储到数据库
- 从refs中的一个开始,遍历commit到存在时停止
- 重新于root索引commits
- 基于git-log拿到changed-path,文件修改存数据库
- 重复2直到完成所有
- 从上到下构建祖先跳表,存另一个表
想了两周要不要每个仓库分一个SQLite数据库
- 更方便管理(主要原因)
- 可能剩下一个复合主键的空间(但是sha256sum对主键来说还是太长了)
但是缺少能够管理256-2048个独立SQLite数据库的现有库(对CGI来说这不是问题), 所以还是保持现状吧。
记录下体积大小的对比,所以不压缩真顶不住。
$ du -sh loose-aports/
28.7G   loose-aports/

$ du -sh aports/
790.1M  aports/
重新设计了bushi的架构:
- 把之前头疼的配置问题拆到第一部分(之前网络端口设置和仓库设置混在一起感觉别扭)
- 为了避免插入中String -> CString -> SQLite的多次复制问题,索引更新部分换C了
- 网站托管部分还是上Rust的Tokio生态,此时SQLite只读,所以可以大幅度开启连接池加速
bushi-hook(-)
collect git repositories’ path and rediect them to next program’s stdin
cron, sleep or triggered by something else
copy bushi.db and send signal to bushi-web, it will refresh connection
bushi-index(C)
$ bushi-index [-vh] [-c] [-t stage.db] repo ...
$ bushi-index [-vh] [-c] [-t stage.db] -

-c  cleanup unused repositories
-t  target sqlite database
-   read from stdin

repo    GIT_DIR
read path from stdin and update index in stage.db
bushi-web(Rust)
$ bushi-web [-vh] [--index bushi.db] [--host HOST] [--port PORT]
open bushi.db with read only option, host web
firefox & dde
火狐在dde上一直有缩放问题,主要症状是系统设置缩放(非1)后,火狐界面异常大。 在论坛上有很多反馈:
- Firefox火狐浏览器界面异常变大原因-论坛-深度科技
- V25和火狐浏览器有点冲突-论坛-深度科技
- deepin 25 火狐浏览器莫名的分辨率变大-论坛-深度科技
- 火狐浏览器firefox高分屏设置无效-论坛-深度科技
- 火狐浏览器问题-论坛-深度科技
- Firefox 窗体整体缩放变大问题-论坛-深度科技
- 火狐浏览器缩放-论坛-深度科技
- 火狐 mozilla 中文版标题栏宽大-论坛-深度科技
- 火狐浏览器分辨率问题。-论坛-深度科技
- 火狐浏览器缩放过大在浏览器中禁用注销后自动复原-论坛-深度科技
- 火狐浏览器的显示比例有问题-论坛-深度科技
- 火狐浏览器界面放大-论坛-深度科技
- 火狐的界面变得好大,怎么办-论坛-深度科技 2022-08-12
从症状上看,缩放不正常时,打开 about:config 配置页面,layout.css.devPixelsPerPx
的默认值 -1 被修改为了当前系统缩放值,如果恢复默认就缩放表现正常。
重启火狐,这个值又被改了,所以肯定是系统干的。 在GitHub搜索发现是dde-daemon仓库的逻辑。关掉相关服务,一切正常:
systemctl --user stop org.dde.session.Daemon1.service
从代码看,dde-daemon扫描用户的 .mozilla/firefox/*/prefs.js 文件并设置上述项,
删掉这块的逻辑就好了,测试下来确是如此。
这部分的代码是从startdde搬过来的,而在startdde项目当年的提交是在2017年:
xsettings: Add dpi supported for firefox · linuxdeepin/startdde@2636914
https://github.com/linuxdeepin/startdde/commit/263691490fb4e1ce36859b606361c1b718bfef30
回到论坛,用户有提出一个规避方案,设置browser.display.os-zoom-behavior的值为0。 这个选项的作用是设置火狐如何响应操作系统的缩放,在2022年7月26日发布的103版本中新增
Bug 1773633 - Allow configuring OS zoom behavior. r=tnikkel · mozilla-firefox/firefox@c7106fc
https://github.com/mozilla-firefox/firefox/commit/c7106fcb8111c4139094f444b78c5ed1632883ec
到这里就一目了然了,2022年103版本开始,火狐新增了一个默认开启的随系统缩放选项, 而我们的系统在2017年添加了手动修改缩放的逻辑,与此处的随系统缩放叠加,造成了界面异常大。 删掉2017年的缩放逻辑就好了。
deepin & sound after startup it quiet
- https://bbs.deepin.org/post/293046
- https://bbs.deepin.org/post/292279
- https://bbs.deepin.org/post/292101
- https://bbs.deepin.org/post/292006
- https://bbs.deepin.org/post/293722
论坛有用户说开机重启后音量很小,我自己使用两个sink都没复现。 目前希望用户多给一点日志,包括关机前后的音量:
pactl get-sink-volume @DEFAULT_SINK@
pactl list sinks
有点怀疑是WirePlumber的音量保存与DDE内部的逻辑冲突,因为他们的音量计算方法不同, 我们系统上的立方音量改为了1.8
import math

# percent to dB volume
20 * math.log10(X ** 3)

# dB to percent volume
(10 ** (-Y / 20)) ** (1/3)
更新:发现了另外一个会导致音量变小的bug,是我们自己补丁中的MONO算法问题, 猜测关系很大,等这个问题修复再测。
alpine
- https://gitlab.alpinelinux.org/alpine/aports/-/merge_requests/92432
- https://gitlab.alpinelinux.org/alpine/aports/-/merge_requests/92719
- https://gitlab.alpinelinux.org/alpine/aports/-/merge_requests/92722
- https://gitlab.alpinelinux.org/alpine/aports/-/merge_requests/92723
- https://gitlab.alpinelinux.org/alpine/aports/-/merge_requests/92730
- https://gitlab.alpinelinux.org/alpine/aports/-/merge_requests/92781
- https://gitlab.alpinelinux.org/alpine/alpine-conf/-/merge_requests/272
- https://gitlab.alpinelinux.org/alpine/aports/-/merge_requests/93058
- https://gitlab.alpinelinux.org/alpine/aports/-/merge_requests/93070
- https://gitlab.alpinelinux.org/alpine/aports/-/merge_requests/93494
- https://gitlab.alpinelinux.org/alpine/aports/-/merge_requests/93543
- https://gitlab.alpinelinux.org/alpine/aports/-/merge_requests/93739
- https://gitlab.alpinelinux.org/alpine/aports/-/merge_requests/93741
双十一购入的电子产品是32G的U盘,在Windows里成功装上了「Linux To Go」
- 下载官网的ISO镜像,标准版就行,虚拟机里网络一般都很好
- 创建vbox虚拟机并挂载盘片,默认512M内存,不需要本地硬盘
- 虚拟机以USB3.0格式挂载U盘设备,
lsblk应该能看到设备是/dev/sdX - 设置环境变量
USE_EFI=1SWAP_SIZE=0并执行setup-alpine
虚拟机一般不开启UEFI所以需要手动指定一下脚本中的EFI不然实体机不识别。 SWAP对U盘要比较高,关掉提高寿命。其他的优化方法暂未发现后续再看。
misc
alsa-lib
alsa居然合并了,上周本来想关掉这个PR来着。 原本的逻辑是先判断大小,再进行线性缩放,可能因为整数除法掉出最开始的判断范围, 所以我改成了先计算最后判断。
snd_tlv_convert_to_dB: Fix mute handling forMINMAX_MUTEtype by qaqland · Pull Request #478 · alsa-project/alsa-lib
alsa-utils
代码盯着看总是有收获,不小心发现errno返回时丢了个负号
alsactl: fix error handling in
check_control_cdev()by qaqland · Pull Request #310 · alsa-project/alsa-utils
WirePlumber
wpctl: add bash completions (!762) · Merge requests · PipeWire / wireplumber · GitLab
https://gitlab.freedesktop.org/pipewire/wireplumber/-/merge_requests/762
其实发现PipeWire本体也没有,但是那边命令太多了,就只做了这里。
language
突然想到有没有什么嵌入式的解释型语言可以同时满足以下几点
- 与C交互良好
- 不带JIT也速度快
- 语法简洁现代
aosc dde port
A: 我觉得这个事情既然不是一锤子买卖,就真得有人持续做
B: 是的,所以现阶段只能drop,不然搞个人临时处理两天意义也不大,不能持续搞的话对大家来讲都是个负面的
后续如果有人做aosc的port,也许能从这里再捡回来
deepin Desktop Environment: drop, orphaned by MingcongBai · Pull Request #13548 · AOSC-Dev/aosc-os-abbs
slog
https://github.com/qaqland/slog
slog是一个C语言适用的结构化日志输出库,基本完工正在修bug写测试补文档阶段。
在推进的过程中收到了XJJ和C语言中文群群友的大力帮助、无私指导, 以后应该能把聊天记录下来,出本小册子《C语言系统编程技巧》。
donations
一开始希望去OpenBSD,但是只有paypal捐款途径,我的国区账号不支持,所以换了家
2025-12
12 月水水的不知道在干什么,有些事情可能没有太大难度, 但是找借口不做就会浪费很多精神里上下文切换的时间。
wlroots
需要进一步测试,顺便试试能不能修(更新:症状都不存在)
- https://gitlab.freedesktop.org/wlroots/wlroots/-/issues/3425
- https://gitlab.freedesktop.org/wlroots/wlroots/-/issues/3257
之前和朋友讨论 wlr_output 为什么有 enable 这个字段,这下就遇到了
多显示器下,需要关闭指定显示器以避免烧屏-论坛-深度科技
pkg-search
SQLite有支持自定义分词器,似乎实现也很简单。
支持中文和拼音的 SQLite fts5 全文搜索扩展 | A SQLite3 fts5 tokenizer which supports Chinese and PinYin
对于 pkg 中的文件路径来说,/ 和 . 比空格更有分词意义。
后面试试能不能把这部分功能迁移过来,避免拖一个巨大无比的 MeiliSearch。
alpine
计划把libgit2项目过一遍升级(SHA256 破坏挺大),很多功能和测试需要再看看
- https://gitlab.alpinelinux.org/alpine/aports/-/merge_requests/94330
- https://gitlab.alpinelinux.org/alpine/aports/-/merge_requests/94375
准备把 C 语言项目 STC 迁移过来,不过要等版本 6 发布
GTK2 很早就 EOL 了,尝试把相关包都 drop 掉。还有其他一些包日常刷下版本
- https://gitlab.alpinelinux.org/alpine/aports/-/work_items/17848
- https://gitlab.alpinelinux.org/alpine/aports/-/merge_requests/94135
- https://gitlab.alpinelinux.org/alpine/aports/-/merge_requests/94375
- https://gitlab.alpinelinux.org/alpine/aports/-/merge_requests/94426
- https://gitlab.alpinelinux.org/alpine/aports/-/merge_requests/94427
- https://gitlab.alpinelinux.org/alpine/aports/-/merge_requests/94429
- https://gitlab.alpinelinux.org/alpine/aports/-/merge_requests/94437
- https://gitlab.alpinelinux.org/alpine/aports/-/merge_requests/94909
- https://gitlab.alpinelinux.org/alpine/aports/-/merge_requests/95035
- https://gitlab.alpinelinux.org/alpine/aports/-/merge_requests/95100
- https://gitlab.alpinelinux.org/alpine/aports/-/merge_requests/95104
- https://gitlab.alpinelinux.org/alpine/aports/-/merge_requests/95109
- https://gitlab.alpinelinux.org/alpine/aports/-/merge_requests/95130
user-aports
可能需要搭建一个流水线,准备把玲珑包先在这边测试
- 公司声誉不好,上游如果做安全审查会耗时很久
- 即使合并也是进 testing,如果 stable 可用又要等半年
- stable 即使可用也是落后半年的老版本
qaqland/user-aports
bushi
可能是和朋友一起去了图书馆、聊天,bushi 进展不错正在稳步推进。 进展之一是架构设计上确定下来。拆分单体:
- bushi-scan
- 扫描 Git 仓库,遍历调用 bushi-index,通知 bushi-web 读写数据库切换
- bushi-index
- 索引 Git 仓库的关键信息到 SQLite。
- bushi-web
- 只读连接池打开 SQLite,基于 Rust 实现高性能网络托管
进展之二是 bushi-index 完成了 40%,陆续解决了 SQL 跨行字符串的嵌入、 全局变量的分配、单元测试、算法说明文档等问题。 预计后面再投一周的时间就能完成这部分。bushi-scan 到时候会写几个 example 留给用户自己做。bushi-web 也没啥难度后面再说。
发现了 Git 一个 Bug 或者可以改进的地方,好像能修但是有点麻烦,以后再跟踪吧
$ export GIT_PAGER=cat
$ git log --pretty=format:%H --name-only
这样会打印出 commit 和对应的 diff,类似下面输出
commit
  diff

commit  <<< 有问题
commit
  diff
现在用的是 format,默认行为是后一个 commit 负责放置一个 \n,
如果用 tformat 则会在当前 commit 和对应的 diff之间放一个换行。
目前观察到每次有效 diff 后会多一个换行,而 diff 不存在时空行消失。
Git 源码主要集中在以下几个函数,其中 diff_queue_is_empty 判断的逻辑挺抽象
log_tree_commitlog_tree_difflog_tree_diff_flushshow_log
在 libgit2 上发现了一个小错误💦 https://github.com/libgit2/libgit2/pull/7175
ctrlp
测试了一哈,ctrlp 比 fzf 慢的不是一点半点。 核心匹配算法似乎可以抽象出来一个组件:
- 终端目录路径跳转(Alt + C)
- 终端历史记录模糊查询(Ctrl + R)
- 窗管启动器应用选择(如 wmenu)
- Vim 不同缓冲区等切换(如 fzf.vim)
- 浏览器历史记录跳转
匹配库还有一些杂乱的需要考虑的事情:
- 英文大小写、其它字符的大小写
- 中文拼音等 IME
- 是否要考虑 LRU
walker-scan + user-input + lib-fzf-algo => output-list
output-list + user-input => exec-or-output
DDUC
拿到了很多周边!见到了很多朋友!茶歇很好吃!希望明年能跟深入的参与。
MISC
mdBook 的前端代码写的很烂,最近更新了侧边栏动态目录才发现我之前都是坏的
https://github.com/rust-lang/mdBook/pull/2993
非常不错的 markdown 工具,作者很热情的升级了依赖库版本来支持龙架构
https://github.com/kivikakk/comrak/issues/707
alsa-tools 这个仓库挺破旧的,不知道为什么仍然存在
https://github.com/alsa-project/alsa-tools/pull/44
Donation
回过头来看之前定下的捐款三点要求很严肃,很难找到对口的项目。 12 月的最后一天发现 fastfetch 符合要求。
https://github.com/fastfetch-cli/fastfetch/pull/2123
TODO
重新梳理了一下对笔记软件的要求,似乎还挺简单的:
- 功能和易用性与 Apple Notes 持平
- 性能和稳定性拉到最满
- 图片、富文本编辑等可有可无
- 开源甚至自研,数据随时导入导出
在大脑中筛选了一下,还是dnote符合这个要求。 不过也许可以自己尝试搓一个,用类似 Git 或者 Quilt 的交互接口。
电脑终于从 Windows 刷回了 Alpine Linux 好起来了。 最近总是装系统,需要找个 dotfile 管理工具来帮助快速启用了。
绿色笔记本
2023 年 11 月 26 日
+2 的师兄毕业留下一个绿色人造皮笔记本,没有写几页,拿来随便记。笔记本的外皮边缘早已剥落,我用美纹纸胶带进行了加固,所以看起来怪怪的
// TODO 图片一张
关于笔记的保存
保存应该简单,类似 pastebin 的纯文本;为了维护逻辑关系,额外添加类似 git 的缓存结构;同时留下一点点类似 sql 或者 shell 的编程接口,方便手动编程,实现模板自动化等
一些关于日后要做东西的记录
- Rogit:就是现在做的 Bushi
- Lspage:就是现在做的 Judou
(怎么这么早想法就有了)
计划:归纳之前 TiddlyWiki 的内容
- hash-blog(就是这里的 mdBook)
- flomo
- 实体媒介?
(仍未完成)
WM 的按键交互设计
希望在窗口管理上,鼠标和键盘能达到相同的可用标准
理论上来说,Super 键应该用于多屏幕时屏幕的选择,但是单屏幕时应当也正常工作(相同逻辑),所以这里把 Super + Num 当作固定的快捷方式用,类似 Windows
(具体按键设置与现在做的相同,略)
《无界面交互》
- Snapchat 在同一会话中才能发起视频通话,模拟“转瞬即逝”
- 最好的界面就是没有界面
- 贴合日常生活流程,而不是一味依赖屏幕
- 数字化杂务
- 自动化 vs 准确无误
很无聊的一本设计原则的书
是一个 TODO
(提醒我把之前 hash 站点的内容搬过来)
自动删除历史消息的 Matrix Bot
- 收到邀请自动加群
- 检查权限是否足够
- 发送帮助信息
- 10 分钟后重新检查
- 删除全部历史消息
- 退群
(当时有被迫害妄想,后来觉得没必要)
ApkSearch
(这里是一些规划,当然也基本实现了,现在网站运行很好,多好页的设计,略)
C 语言实现默认参数
bar((1, ##__VA_ARGS__))
当第二个参数不存在时,## 可以吞掉前面的 , 实现默认调用;存在时遵循逗号运算符,留下后面的参数。
(相关成果已发表在“小红书”)
当时的 TODO
能不能把 jrnl(一个终端日记工具)的内容同步到类似 flomo 的网页中展示
安卓代理调试
希望有一个安卓程序可以转发指定应用的全部流量到 socket,调试起来更方便
其他
还有好多和 gitweb 相关的设计,不过这些内容都已经思考完善了,略!
2022
之前的记忆基本丢失了,这里是从垃圾堆和网盘角落发现的一些痕迹。 丢掉可惜,但是也没什么信息量,就全当作当时的情绪日志吧。
当时下载了 Logseq 来写日记,但是这个软件在我的电脑上卡卡的,后面就没用过了。
2022-12-12
- 假期计划
- 《数字图像处理》、OpenCV
- 医疗核磁共振 原理
- 太赫兹
- 光学?电磁学?
- Wayland
- 《wayland-book》翻译审校合并
- 食铁兽系列教程学习 https://github.com/JackeyLea/Wayland_Freshman
- 源码阅读
westonwlrootsswc
- 考研项目
- 基于
github/go-rod/rod的各学院考研调剂信息监测 meilisearch的docker部署 https://fly.io
- 基于
- 相机:CCD和CMOS的区别
2022-12-13
- 红外图像模式识别
- 这学期看的影视作品:
- 人民的名义
- 人生切割数
- 电影用到的面部捕捉,和DIC有点像
2022-12-14
- 鼠标的光学追踪和DIC有点像
- 《Estimation of Damage》
- 温度(T)和热反射系数(R) 存在关系
- 缺陷的 depth(d) thickness(h) width(r) 与R存在关系
- 保持两个参数不变,控制变量法
- 可能的方向:缺陷形状检测
- 假期计划
- 学习Abaqus,对脉冲激励红外检测进行模拟
- 学习热传导方程、nonlinear finite impulse response (NFIR) model
- 数字图像处理
2022-12-15
- 有点想写点总结啥的,因为明天就要跑路了。
- hat.sh翻译,第一次开始摸索Linux
- 小软件diary、pwexport
- wayland-book翻译,重构hugo-theme
- 购入50w.org域名,尝试了二级域名分发
- filen翻译
- 考研网站v3前端,kfcv50.day
2022-12-16
这里是各种要用到的模板库(做了份模板)
开心
- 群友(陶)v我50,更新
kfcv50.day - 很曲折但是赶上高铁,最后成功到家了
- 提前完成2023年博客主题:rss-only
难过
- 等公交208很久都不来
- 公交又慢又冷,肚子疼
- 拉裤裆了(本年第三次),包里只带了3张纸
吃惊
- 到家后,爹说全家发烧(阳了)
- 李怡君发烧快好了
还有
- NUC连不上家里的WiFi和网线,明天用显示器试试
- GitHub的ssh丢了,又配置了密钥和让它走代理
- 戴n95口罩耳朵疼,最后红绳卡在帽子节上还挺好的
- 10元包邮的眼镜腿可能坚持不下去了,太松了眼镜总是滑下去
- 系统的交互体验计划:如何用按键、旋钮操作整个系统,触屏的可选择替代性
- TODO Carplay
- TODO Chrome TV
- TODO Apple TV
2022-12-17
开心
- 买了个小小的采集卡99¥,及时发现地址不对改过来了耶
难过
- 学长不给我文献,说让我自己搜,我都不知道关键词是啥,搜了几个感觉不对
- 机器学习没有找到入门路线,yolo反正排除了
- 电脑还是下载Win11失败,无可避免的安装了不纯净的软件,它不干净了
还有
- 我问PB阳了没有需不需要药,她说好感动,其实我只有治XXXX的
- 傍晚的时候发现了一个很不错的数字图像处理教程:花开花谢总相宜 - 哔哩哔哩
- 早饭面饼煎蛋稠米汤、午饭芹菜青椒牛肉、晚饭软膜,味道不错
- 完成了恋爱小组的退出理由,等待退钱
2022-12-18
开心
- 和PB打王者荣耀了
- 快递明天就要到了
- 世界杯决赛,上半场第二球好厉害
- 白嫖群友的 一元机场
难过
- b站刷的有点多,浪费时间…
吃惊
- 爆机少女喵小吉 团队好厉害啊,服装道具拍摄模特都很认真
2022-12-19
开心
- 采集卡到了,NUC可以显示!
- 研究生学术与职业素养讲座 结课~
- 又上王者了!还是MVP
难过
- 有了采集卡看显示之后,发现家里没有能用的键盘
- 我的Moto手机、MatePad平板,都不支持HDMI输出
- XXXX里大家都有好看的头像,我没有
- XXXX(到家第三次了),头疼
还有
- 大概懂了二维傅里叶变换?
- 看到一个很不错的视频 哔哩哔哩 - 老奇好好奇 - 核磁共振为何知道
2022-12-20
难过
- 头晕
2022-12-21
开心
- NUC终于可以联网了!
还有
- 低烧
2022-12-24
开心
- 差不多好了,也不用吃药了
难过
- Wayland 看不明白
- Abaqus 安装后打不开
- 机器学习无从下手
还有
- 考研网站应该要放弃了
- sb CAJViewer 卡的要死
CCD和CMOS的区别
- https://www.phase1vision.com/blog/difference-between-cmos-and-ccd
- CCD和CMOS在感光处理上存在差别,前者统一、后者小块单独处理
- CCD发展较早,CMOS近年发展迅速
数字图像处理
- 图形学&图像学
- 图形学:点线面体
- 图像学:相机拍的照片处理
- 空间滤波:不是点和点的映射,还包括附近点
- 均值滤波
- 模糊边缘
- 高斯滤波
- 能保留边缘
- 中值滤波
- 抑制椒盐噪声
- 破坏边缘细节
- 拉普拉斯算子、梯度、图像锐化
- 高斯噪声:均匀噪声
- 椒盐噪声:极值处
- 傅里叶变化
- 高频、锐化、边缘
- 低频、主体、降噪,集中在中间
- 均值滤波
- https://www.bilibili.com/video/BV1tx41147Tx/
太赫兹
- 期刊
- 方向
- 通信 Terahertz Communications
- 计算机断层扫描 CT
- 光谱成像 Spectroscopic Imaging(类似红外光谱图)
- 雷达 FMCW Radar Imaging
- 测厚度?
- 文章
难受
PS,后来整理的时候发现已经很久没有这种身体感觉了
- 不舒服是种什么感受
- 小时候在舅母家吃午饭(再去外地读初中之前有次)
- 在图书馆写字(应该也是大一)
- 下雨
- 上材料力学课老师不看我(本科在一楼的小屋)
- 上政治课(应该是大一上学期的时候)
- 改以打雪仗(高三小院的时候)
- 高三去找ZDY
计划
PS,之前有点幻想自己什么都能做(虽然现在也经常这样想),列了清单防止自己乱想。 这个计划最早应该出现在 2019 年,最迟不晚于考研时期。 计划列表后来逐渐因为接触 Alpine Linux 停止增长。
- 输入法
- 严格来说这是我接触 Linux 的开端,我想做输入法→Windows好乱→Linux桌面, 现在已经没那么对隐私和垃圾软件抓狂了。 单人微博
- 这个概念有很多变体,比如评论系统、个人微博、网络记事本、博客系统等等。 但是都指的同一套服务:可以像微博一样吐槽、像 TiddlyWiki/Blog 一样构建文档。 后续没有继续推进,因为技术上比较无聊、但是产品上需要考虑的太多了。 视频下载器
- 我现在没有任何关于下载器的想法了 收趣云书签
- 后来这个项目命名为OBS(Open Board System)。 项目场景考虑个人、兴趣群组、公司团队等垂直领域的知识分享与信息检索。 不过因为技术上比较无聊搁置。 浏览器
- 话说我居然真的幻想过挑战权威吗?白日做梦 +1 Web Office
- 希望能有那种在线网站纯 WASM 实现对 Office 格式文件的只读预览,白日梦 +1 MP3
- 希望能有个键位和 iPod Shuffle 一样甚至更少的无屏小夹子 收音机
- 似乎有教程,不过现在直接买一个应该更合适 做TF卡双卡槽raid
- 后面有机会可以试试 键盘
- 这里当时想的应该是如何实现在键位特别少的情况下,尽可能无感的满足日常体验
游戏
做游戏严格来说也在上面的计划里,但是就像造轮子需要先种橡胶树(?) 这里设置了一些限制,还没来到计划这一步
- 2D:不然相当多的设备无法省电运行
- PVP:低成本 PVE 很难撑起一个玩家社区
- 键鼠、手柄、触屏:哦哦哦要支持不同平台设备全部交互良好
- 重文字:买不起 CG
- block:不应该做虚假的大世界,而应该刻意营造有效的空间